
Contents
Use KAILOS to make your indoor map and build your own indoor location-based service. The manual has two steps: Step 1 builds the radio map of a building with the web-based map construction tool and the Android data collecting tool; Step 2 develops applications with the KAILOS RESTful API.
KAILOS system architecture
The KAILOS indoor positioning system combines an indoor map construction tool, a sensor data collecting tool, a data collection server, a location server and a map server in a single system, providing a convenient development environment for location-based services.
KAILOS runs on the server side. This keeps the system simple to use and maintain, and keeps the location-based services built on it lightweight.
Indoor map construction tool
- Floor planning tool
- POI editor
- Survey planning tool
- Road network editor
Sensor data collecting tool
Android app
Data collection server
- Raw-data processor
- Radio map generator
Raw data
Location server
Inputs: Wi-Fi · PDR · other signals
- Signal filter
- Location filter
- Map matching
- Hybrid location provider
Map server
- Directory service
- Routing service
Maps
Step 1: Build the radio map
Before an indoor map of a building or a floor can be served, a radio map of that area has to be built. Follow the steps below; registering points of interest (POIs) and roads is optional.
- Step 1Adding buildings
- Step 2Adding floors
- Step 3Planning signal collection
- Step 4Signal collection
- Step 5Completion of radio map construction
Buildings, floors and signal-collection plans are registered in the KAILOS web-based map construction tool. The signals for the radio map are collected with the KAILOS data collecting tool, an Android app, and the result can be checked with the test navigation app.
- Web-based map construction toolBuildings, floor plans, POIs, roads and survey plans · browser (Chrome)
- Data collecting toolWalking Survey Collector · Android app (WSTool.apk)
- Test navigationKAILOS Localization Tester · Android app (kailos-tester.apk)
Access to the tools for your building is arranged with our team.
Request accessWeb-based map construction tool
The web-based map construction tool runs in a browser: open the KAILOS site on a computer to use it.
Minimum requirements
- A computer or mobile device with internet access
- A browser that supports HTML5 Canvas
- A browser that supports standard JavaScript
Adding buildings
Sign in to KAILOS to use the map construction tool. Without signing in you can view the indoor maps other users have built, but you cannot add or change buildings.
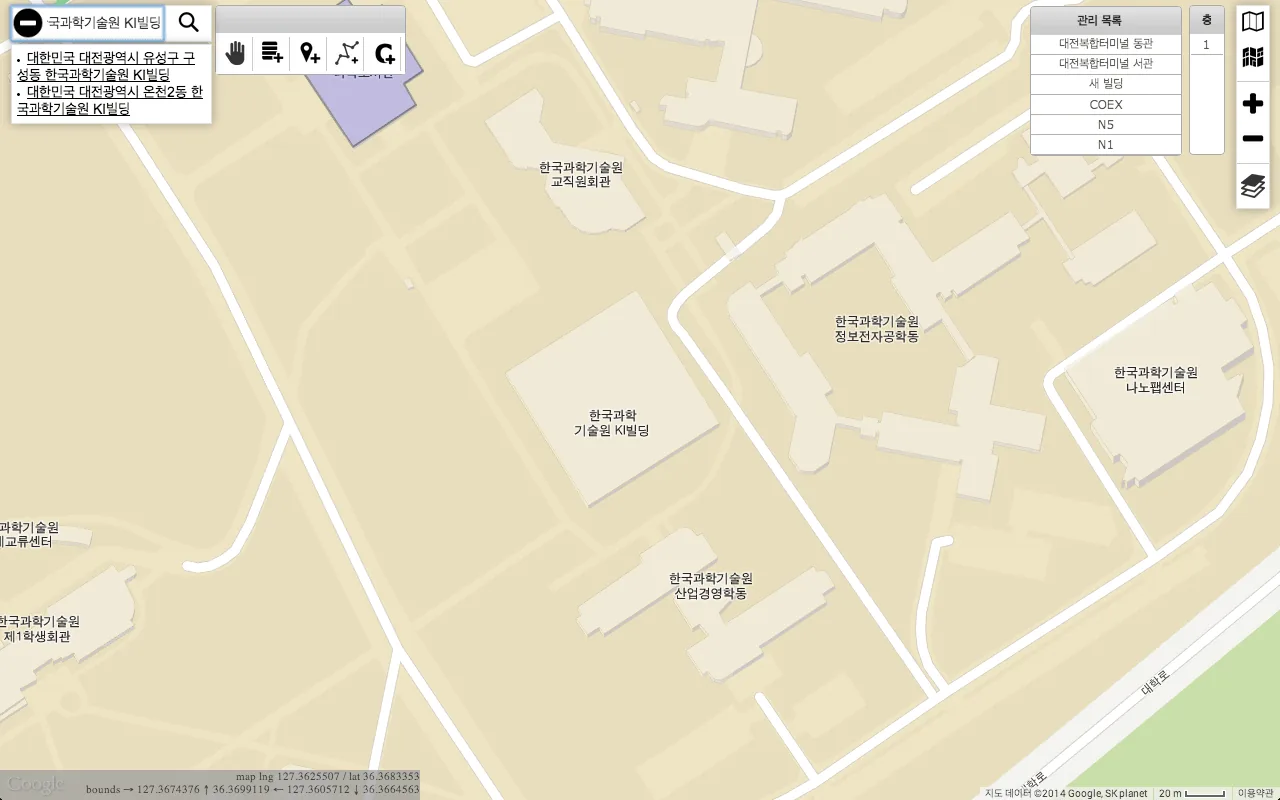
After signing in, open the tool and move the map to the building where you want to provide indoor location services. The search box at the top left finds a building quickly by its address or name. Zoom in until the building appears large enough to work on comfortably (Figure 1).
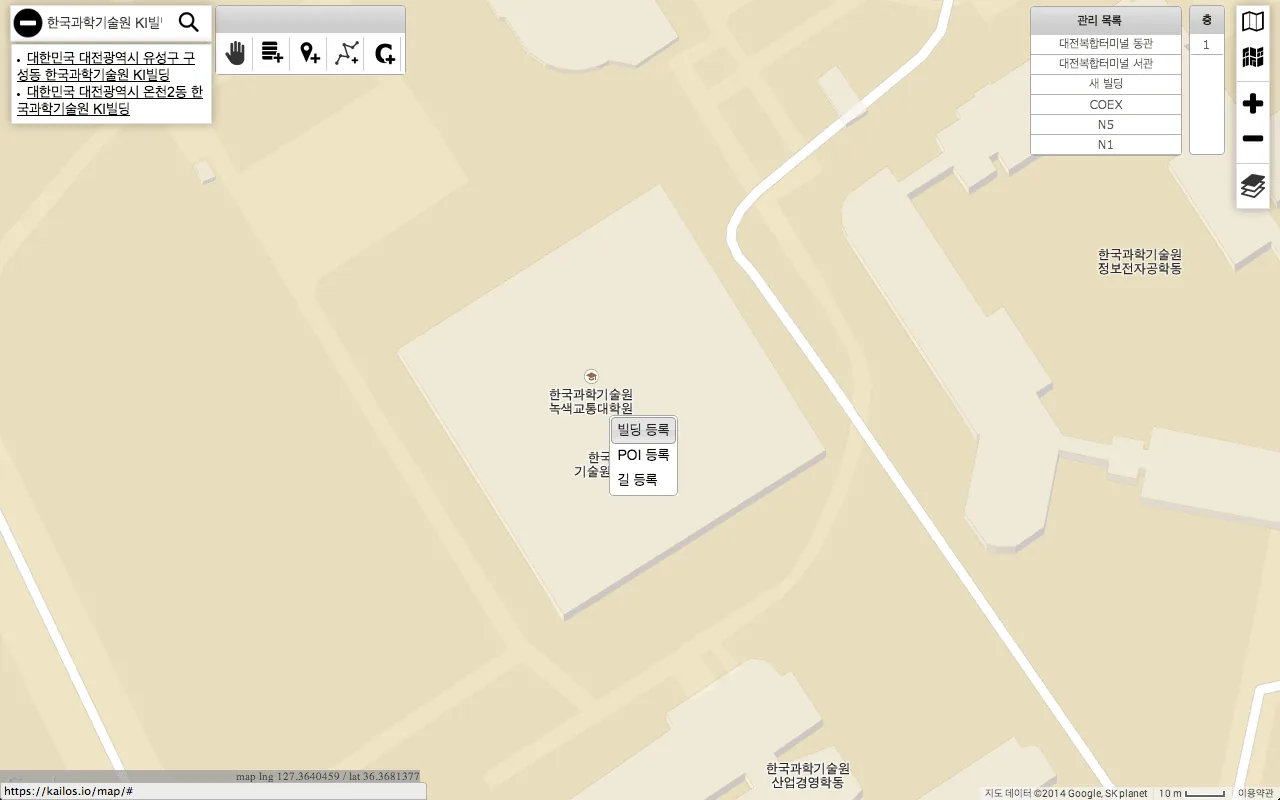
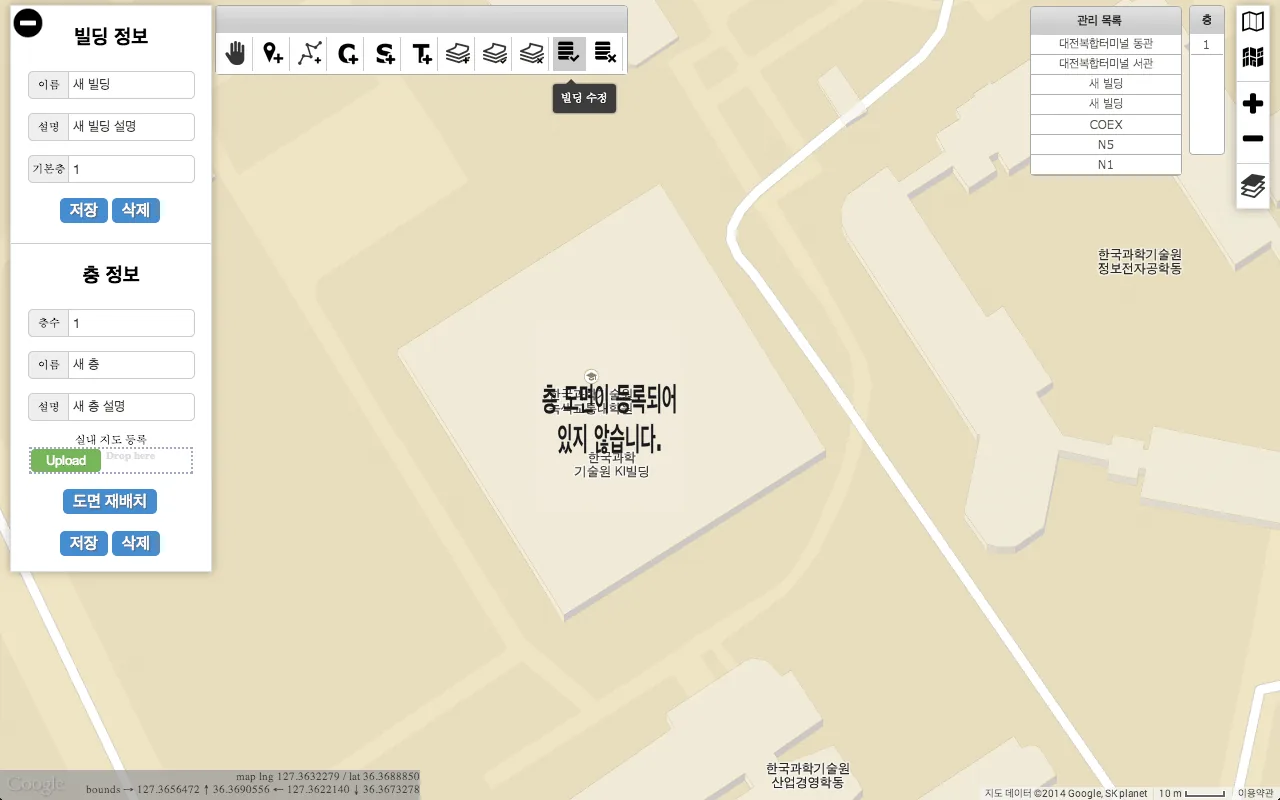
Place the mouse pointer over the building and click the right mouse button (Figure 2). Choose Add a building from the menu: a new layer, the building layer, appears on the screen. Click Modify a building in the top toolbar to enter building modification mode (Figure 3).
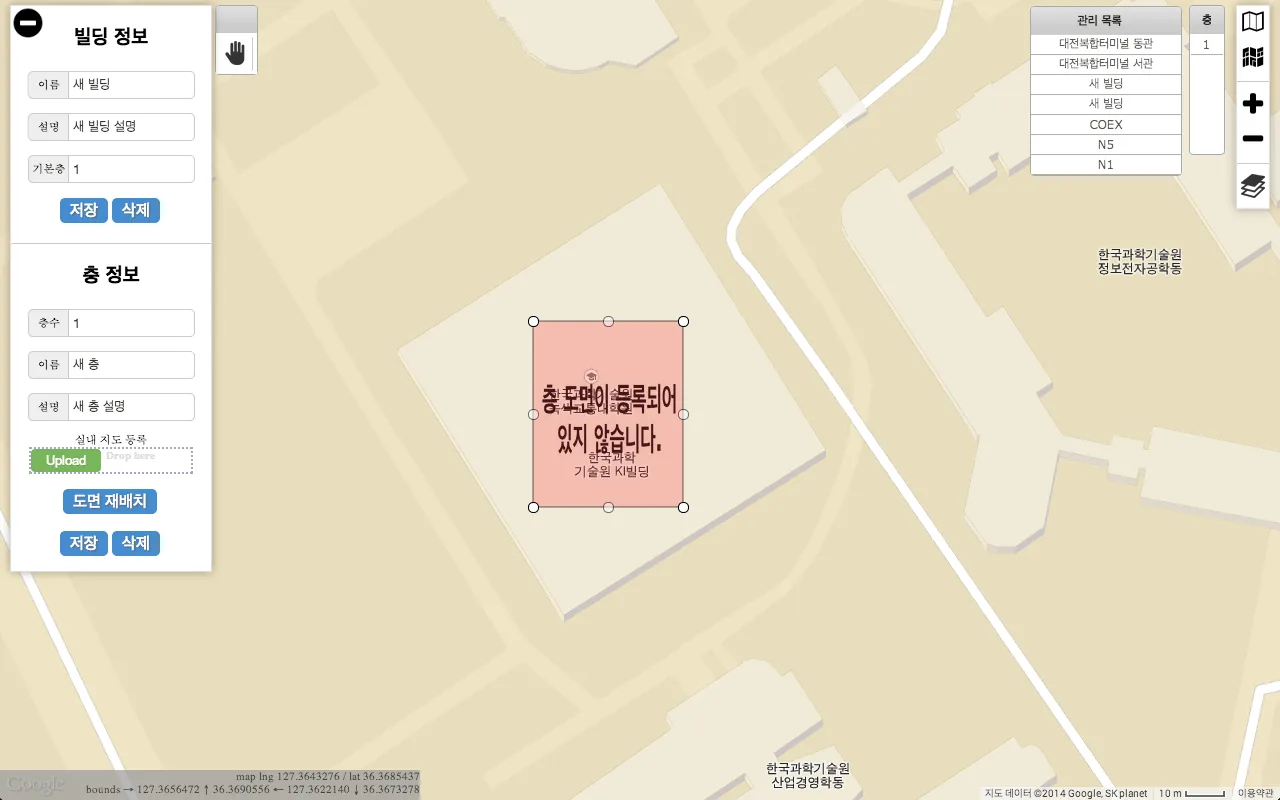
In building modification mode, drag the points on the border of the layer to align it with the outline of the actual building (Figures 4–5).
 — open the full-size image
 — open the full-size image
 — open the full-size image
 — open the full-size image
 — open the full-size image
Adding floor maps
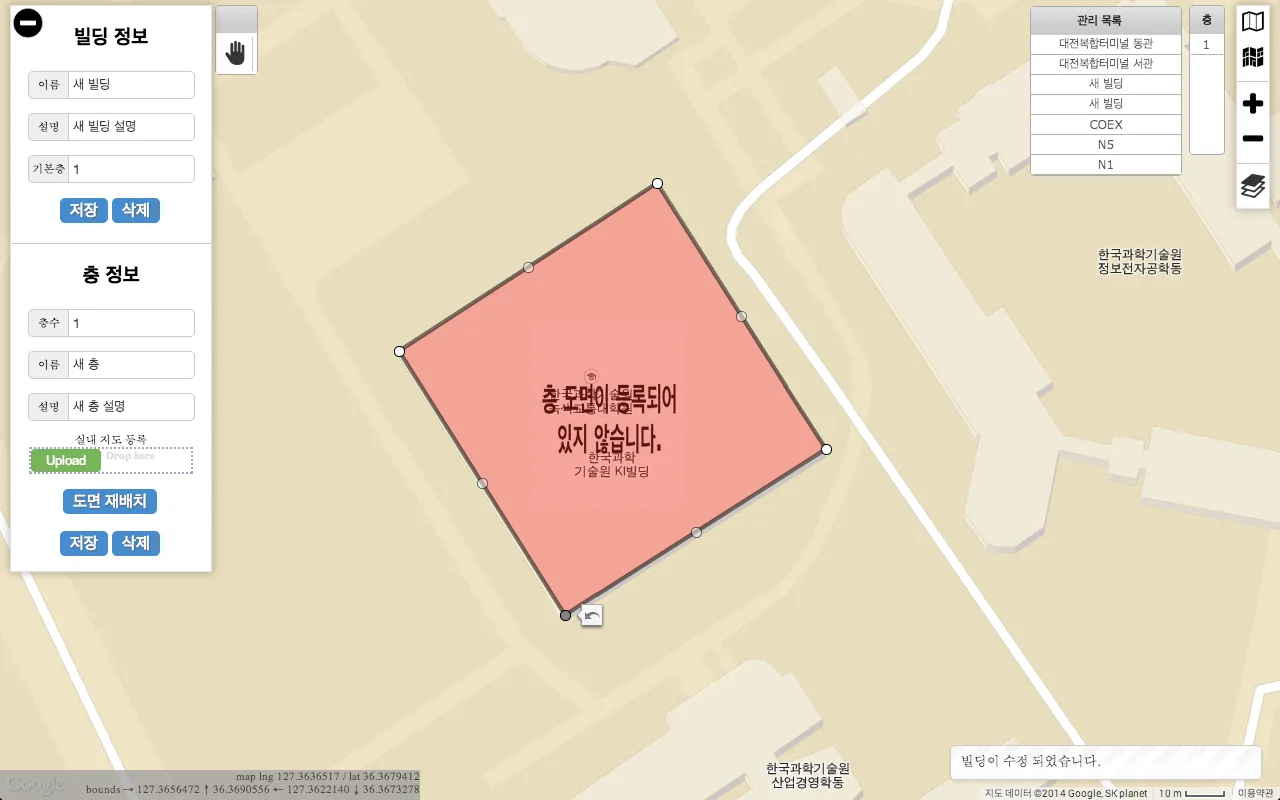
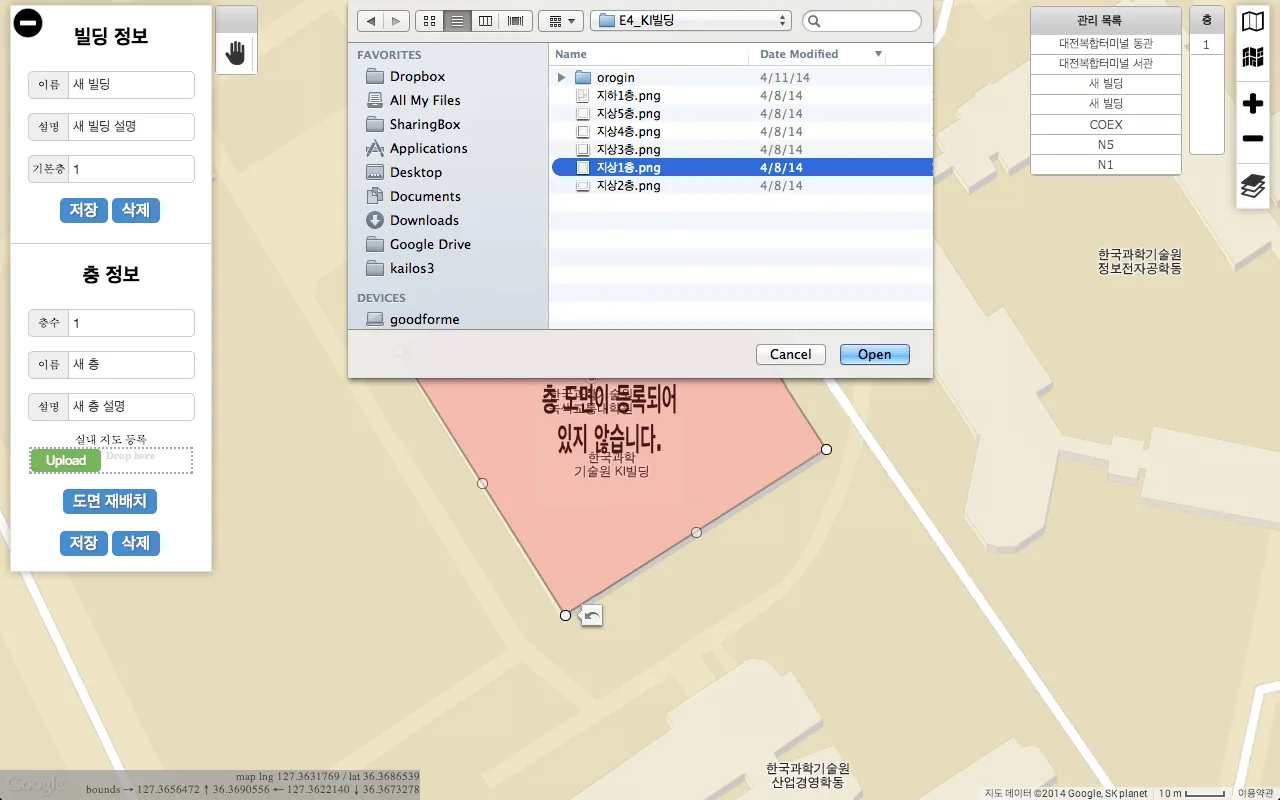
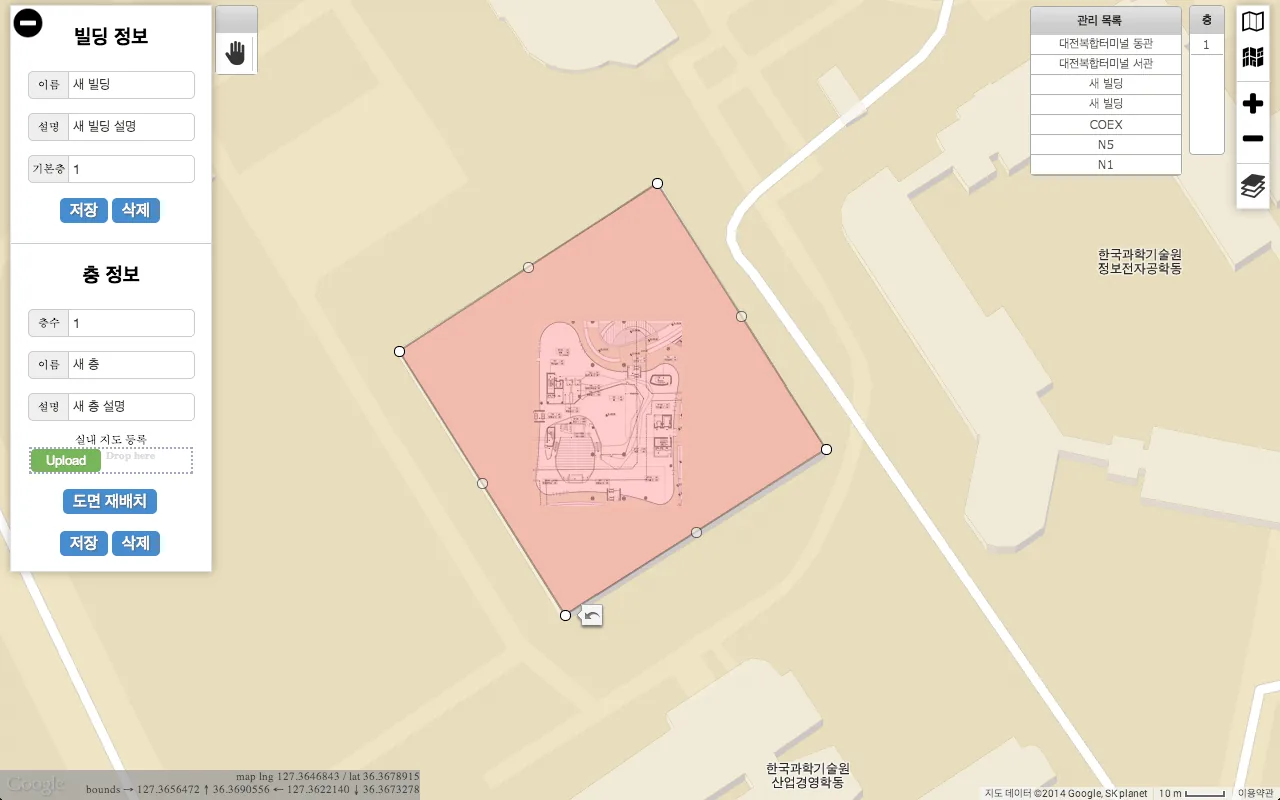
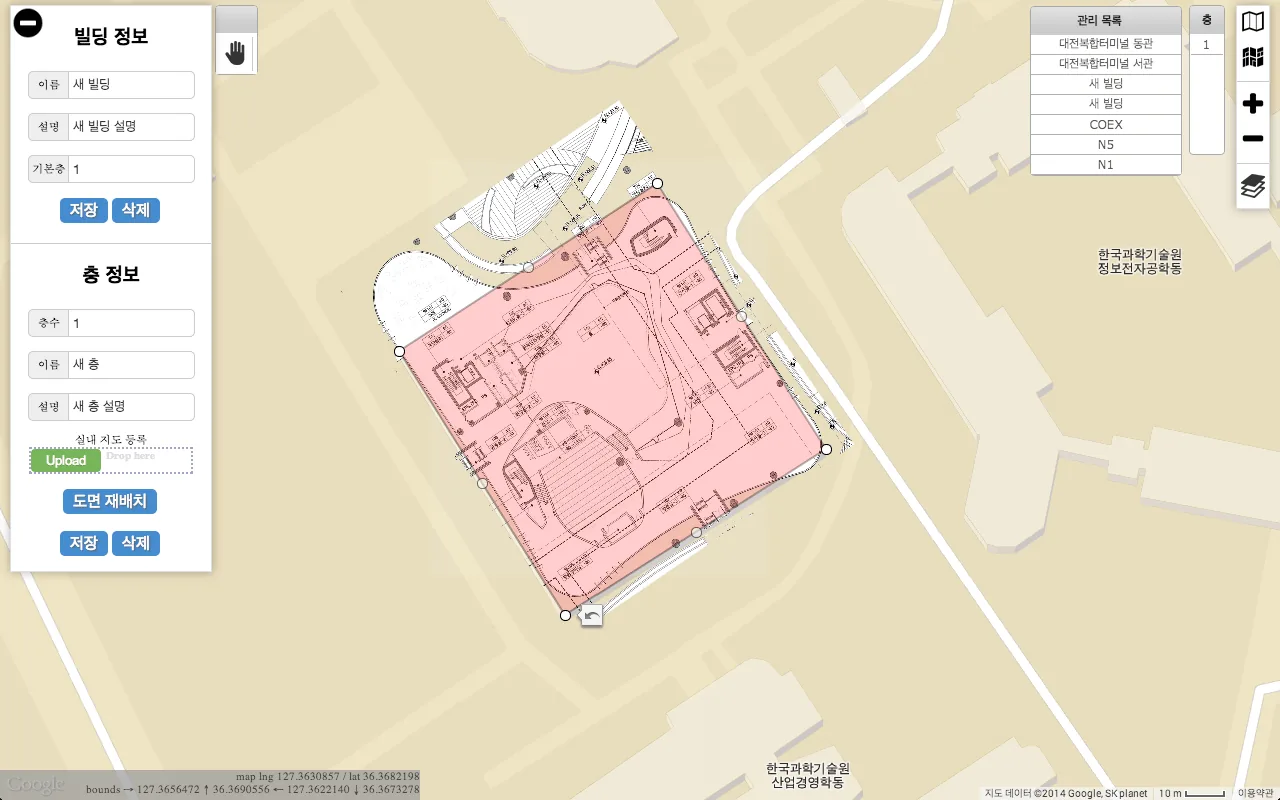
Click Upload and upload the prepared floor plan image of the floor to the KAILOS server (Figure 6). The image appears inside the building layer (Figure 7).
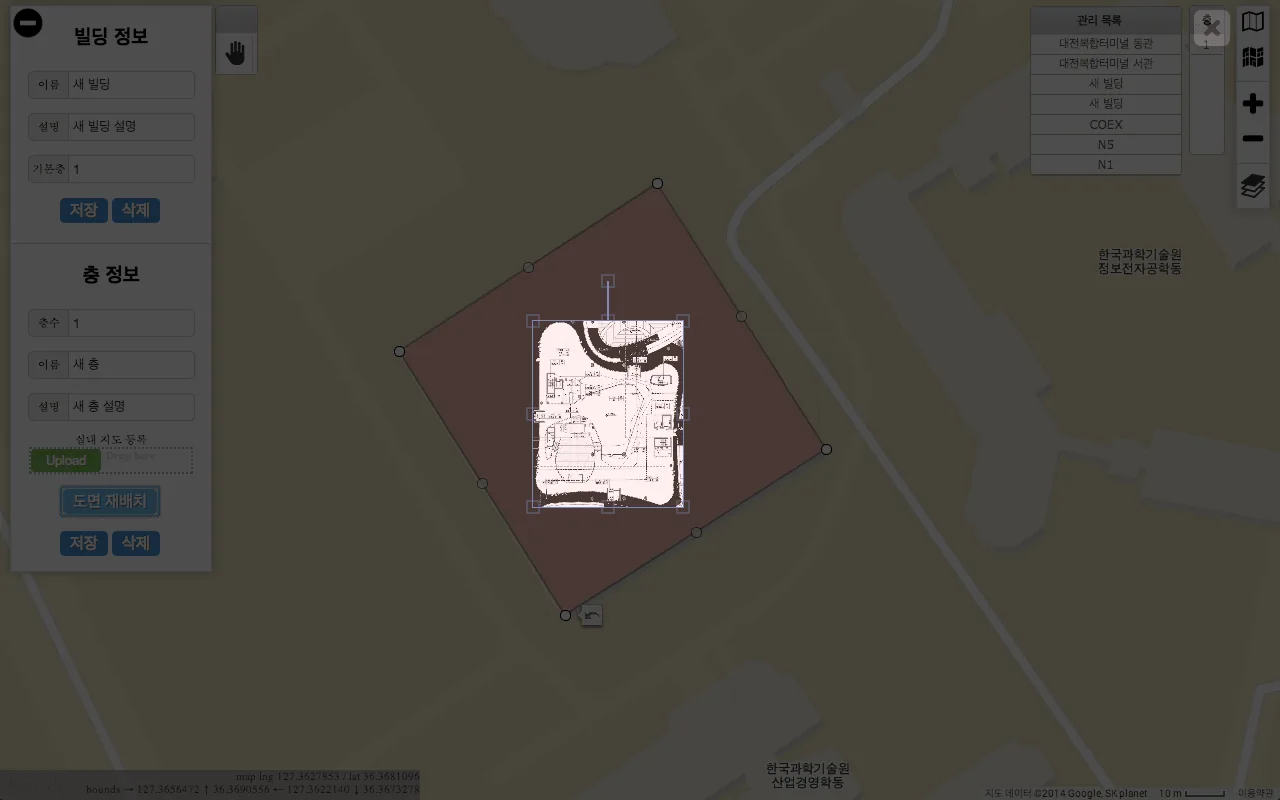
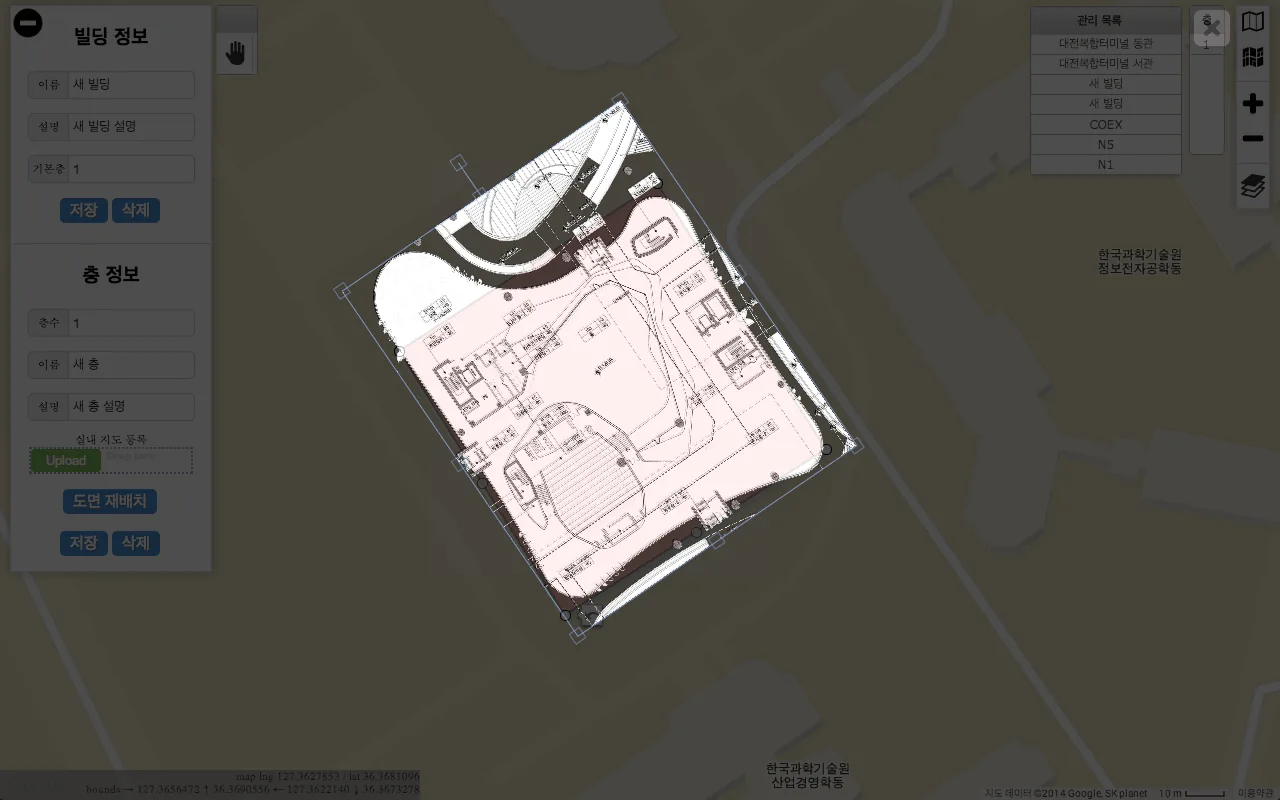
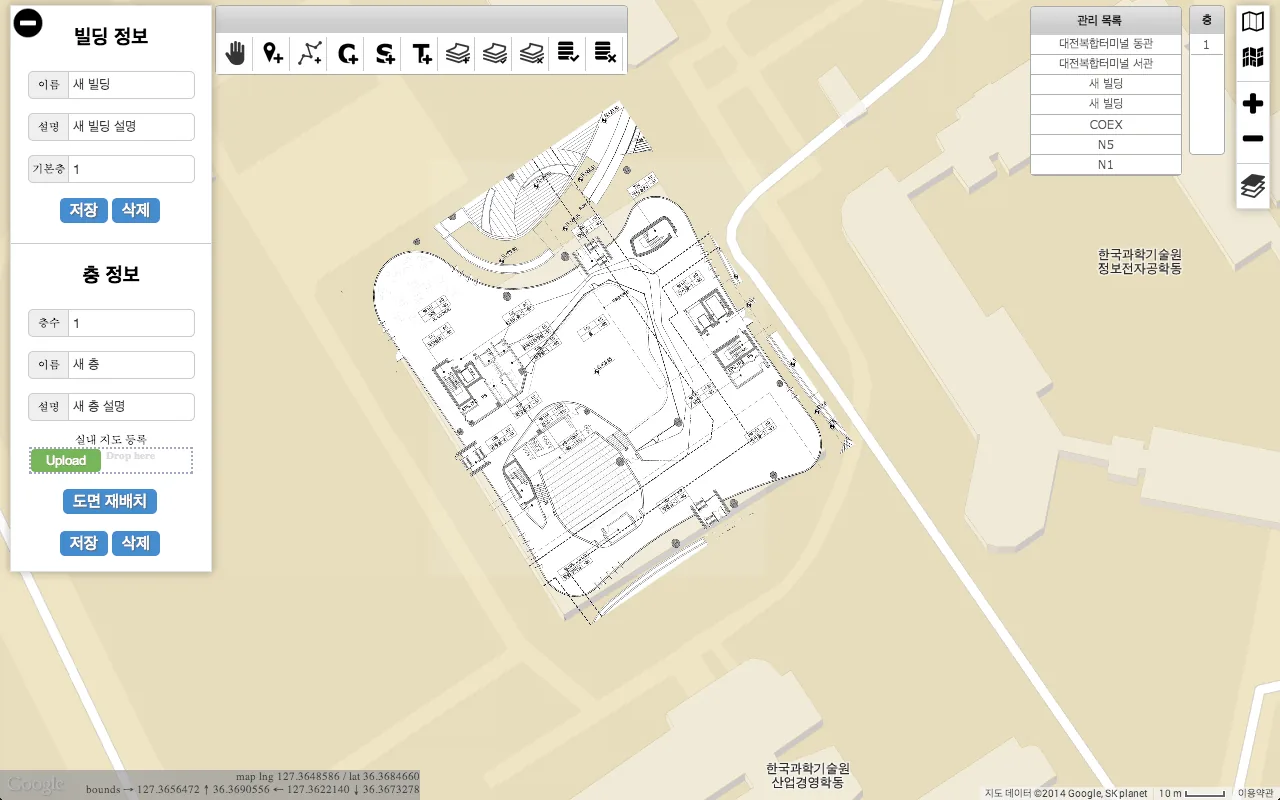
Click Align a map image to place the floor plan on the actual building: move, scale and rotate the image until it matches the building (Figures 8–11).
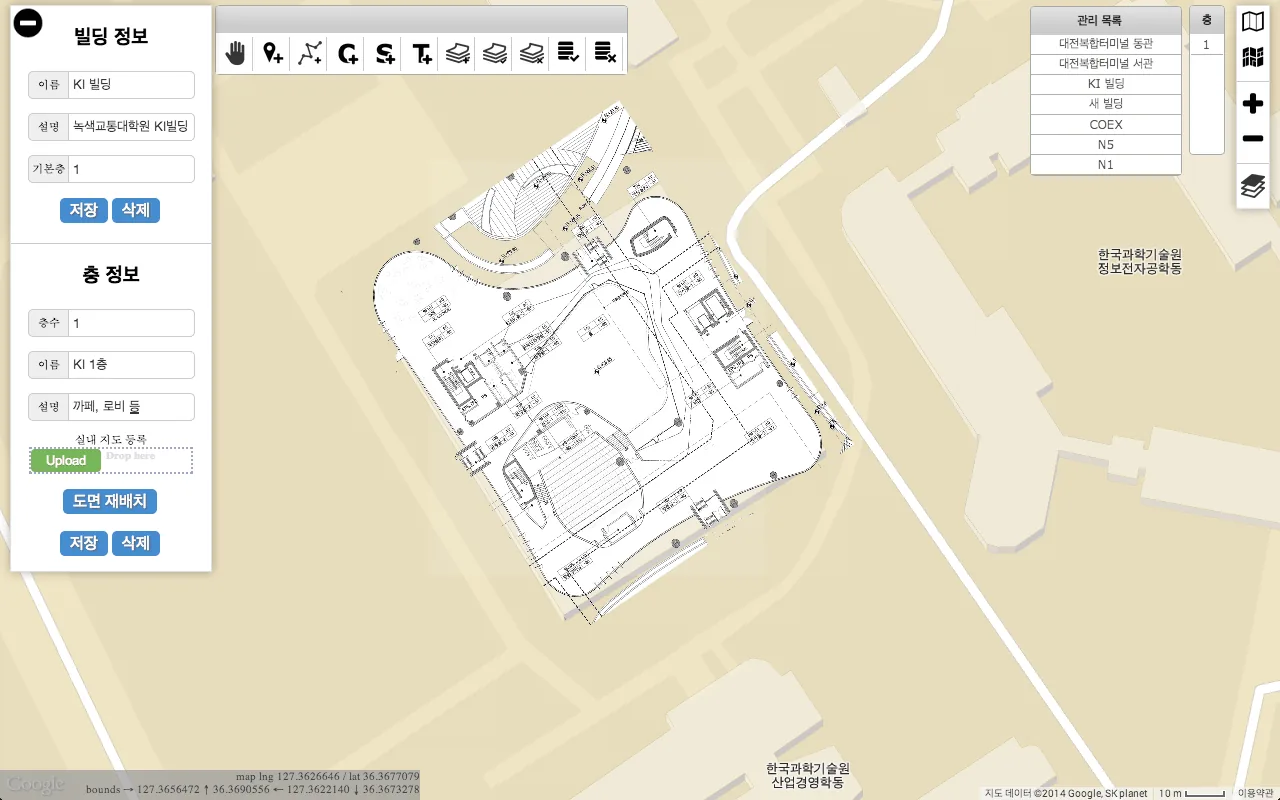
When the alignment is finished, enter the name and other information of the building and of the floor, then click Save to finish (Figure 12).
 — open the full-size image
 — open the full-size image
 — open the full-size image
 — open the full-size image
 — open the full-size image
 — open the full-size image
 — open the full-size image
Registering points of interest (POIs)
Next, register the points of interest inside the building (optional). A POI is a place that can be a destination when indoor navigation is provided — for example an office, a stair or a restroom.
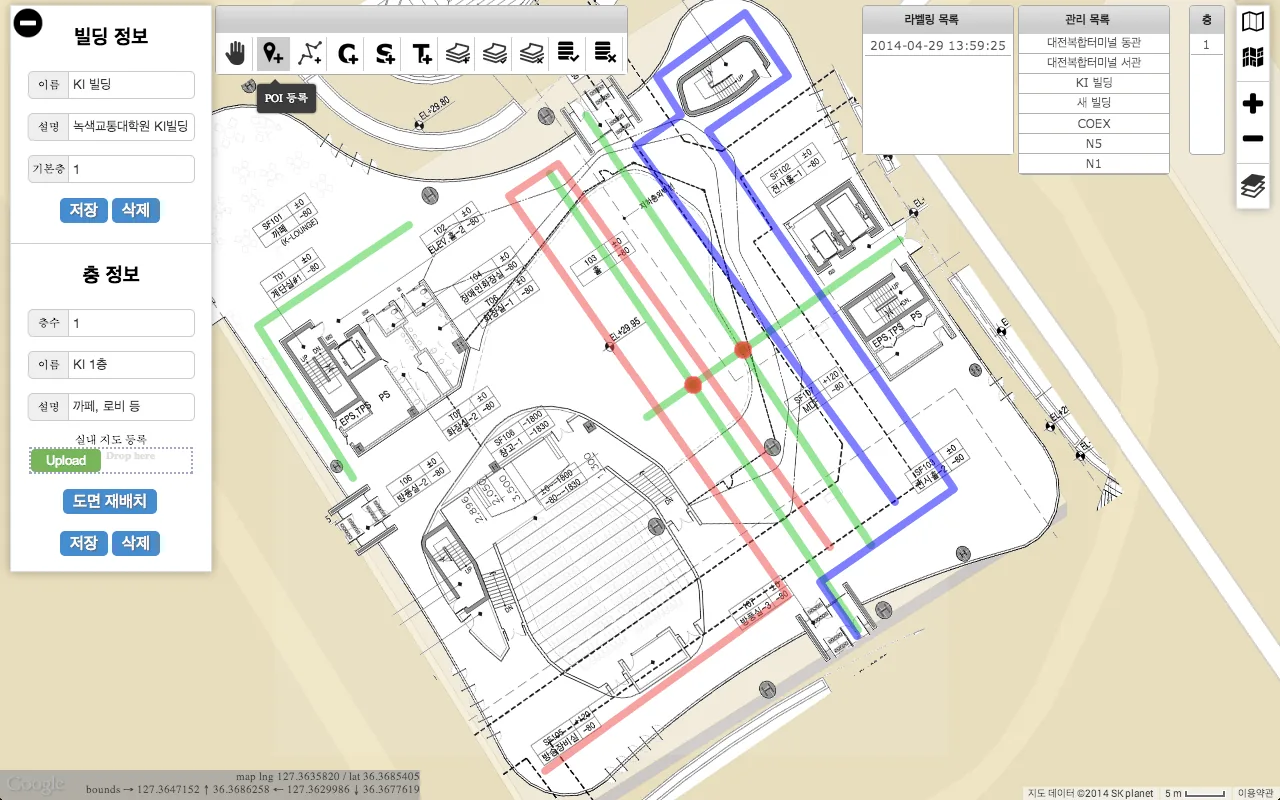
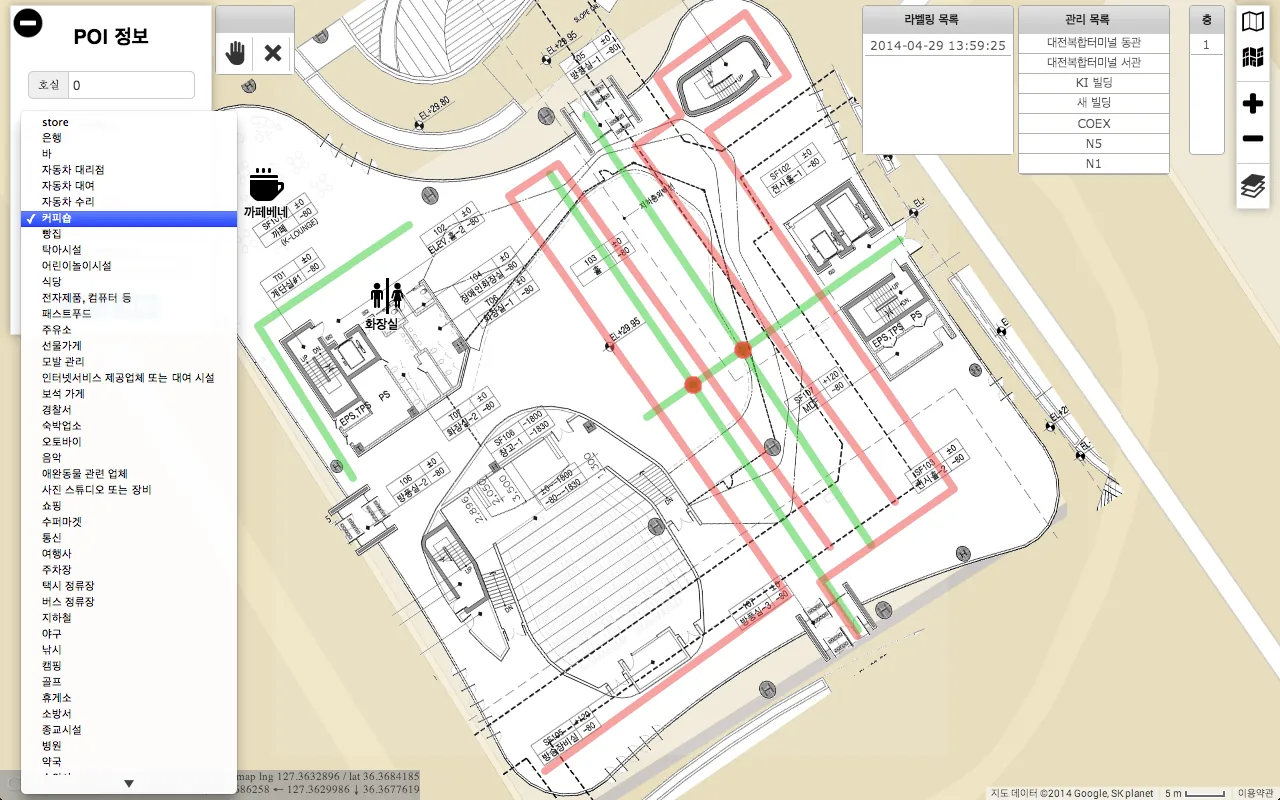
Click the POI button  at the top of the map, then click the place you want to register. An input panel for the place opens at the top left (Figure 13). Enter the information about the place and click Save, then click the hand button
 to finish registering the POI (Figure 14). Register other places the same way.
 — open the full-size image
 — open the full-size image
Registering roads
A road is a path that users of an indoor location-based application can walk along. Registering roads is optional, but when an application is built, KAILOS map matching uses them to show the user’s location more precisely.
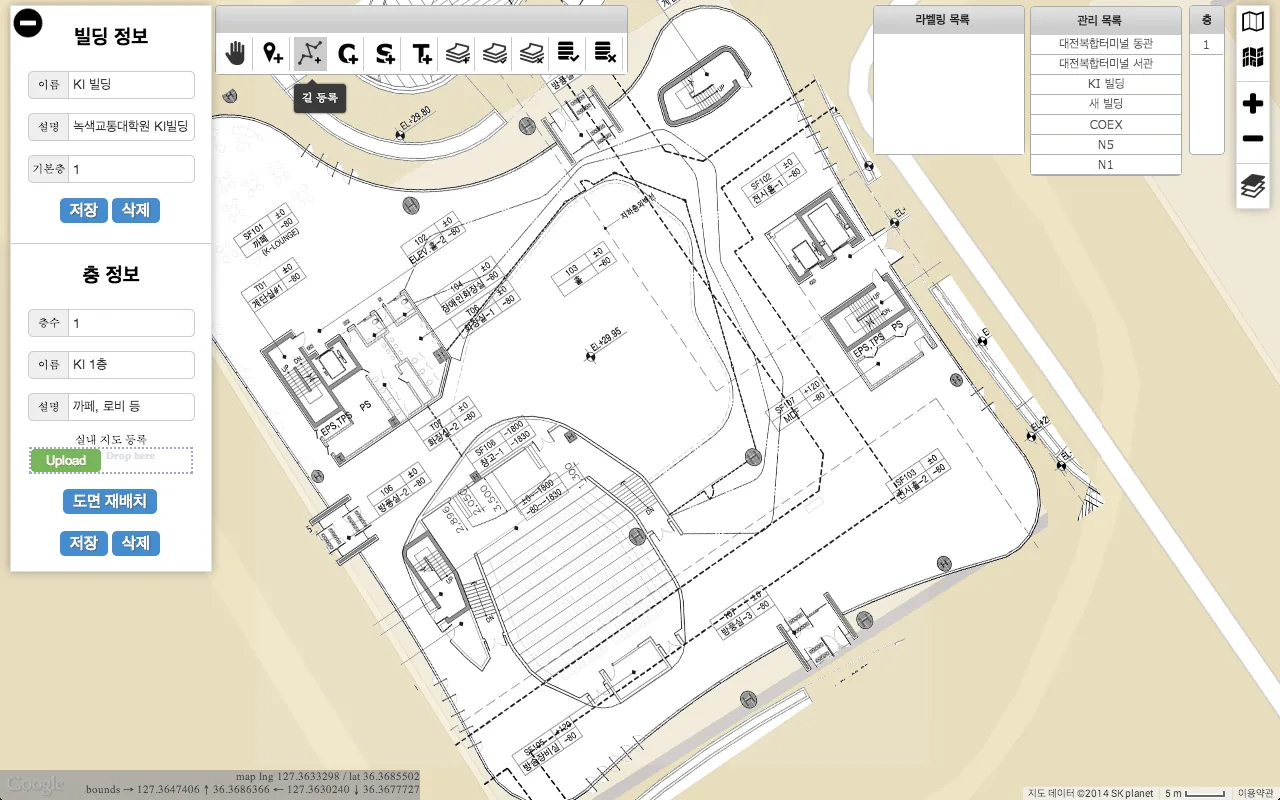
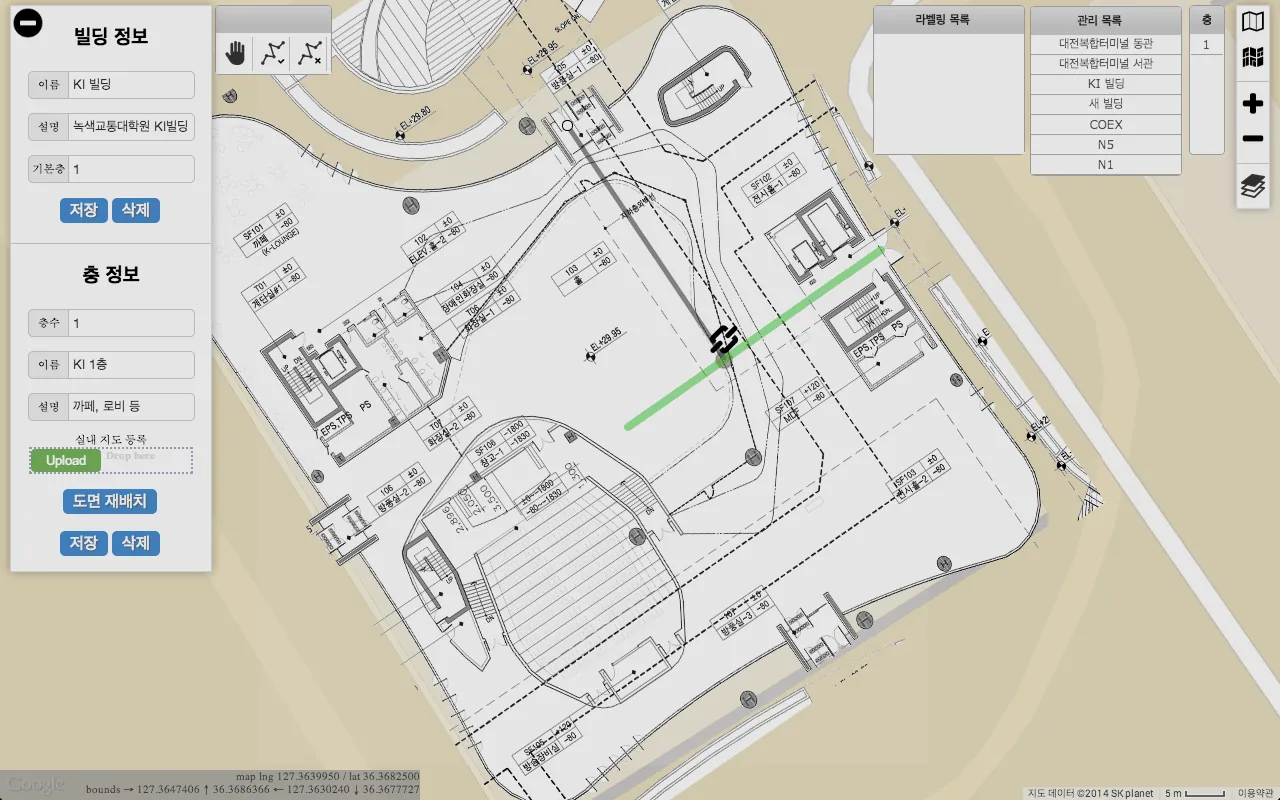
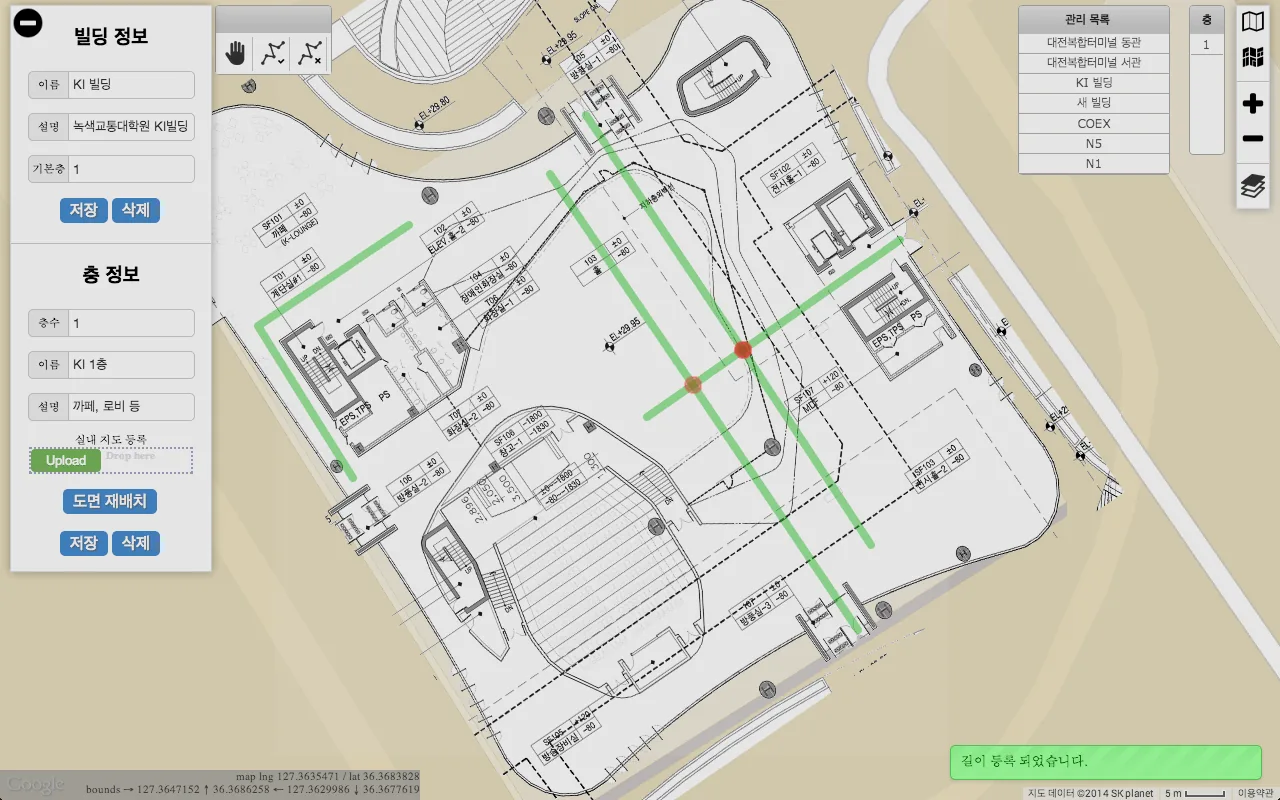
Click the road button  at the top of the map (Figure 15) and click the points on the map where the road runs. Double-click the end point to finish the road (Figure 16), then click the hand button to leave road mode. To continue from an existing road, click again and keep drawing. Road intersections are shown as red dots (Figure 17).
 — open the full-size image
 — open the full-size image
 — open the full-size image
Planning signal collection
Before signals are collected, plan the paths along which they will be collected. In the next step, collectors walk along these planned paths — survey lines — with the data collecting tool. Drawing them works much like registering roads.
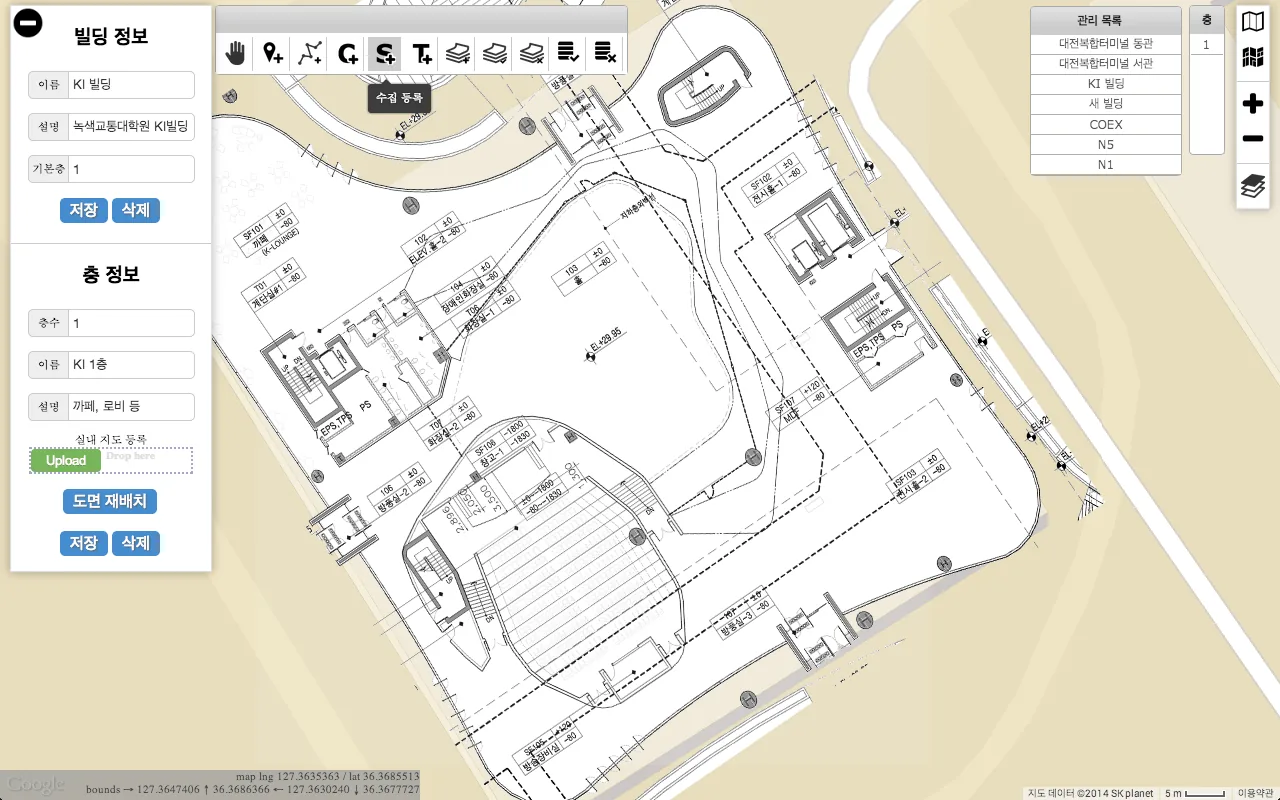
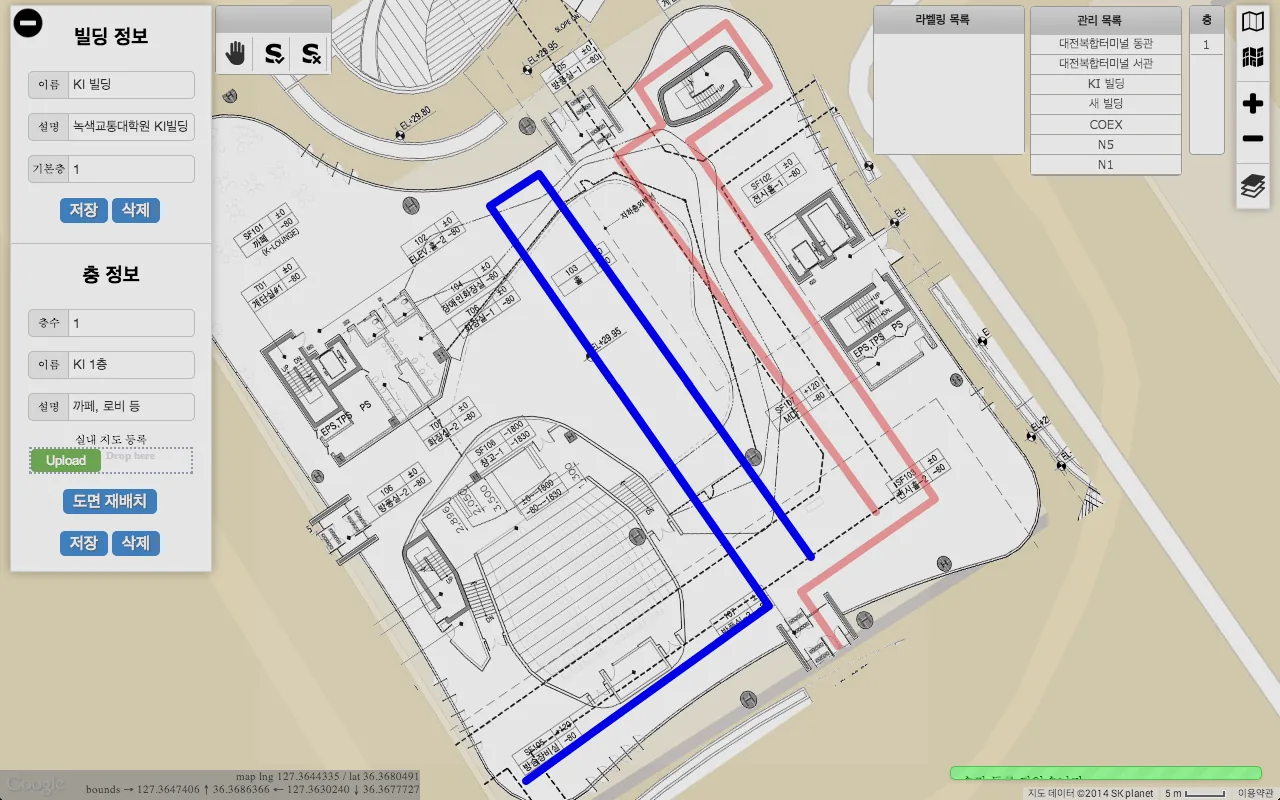
First hide the roads so they do not get in the way: click the layers button  on the right of the map to open the menu for showing and hiding layers, and clear the Road check box (Figure 19).
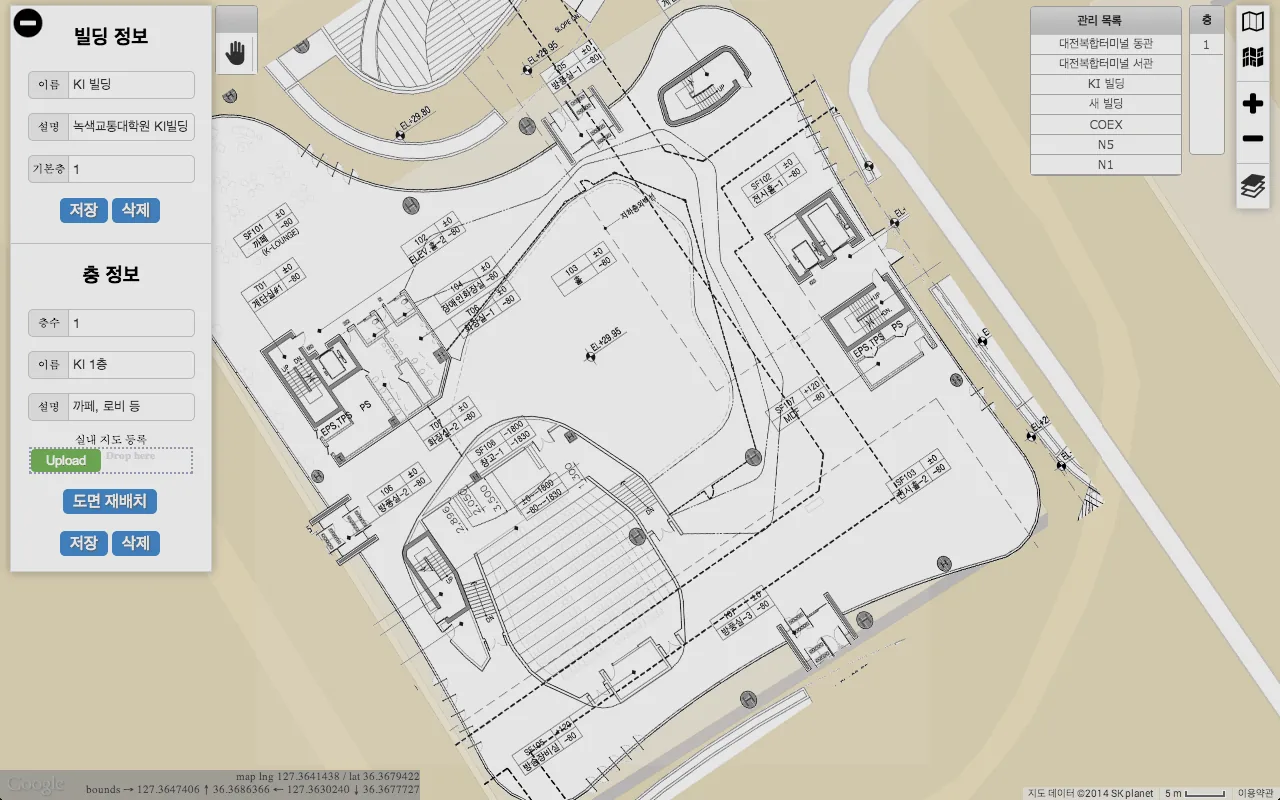
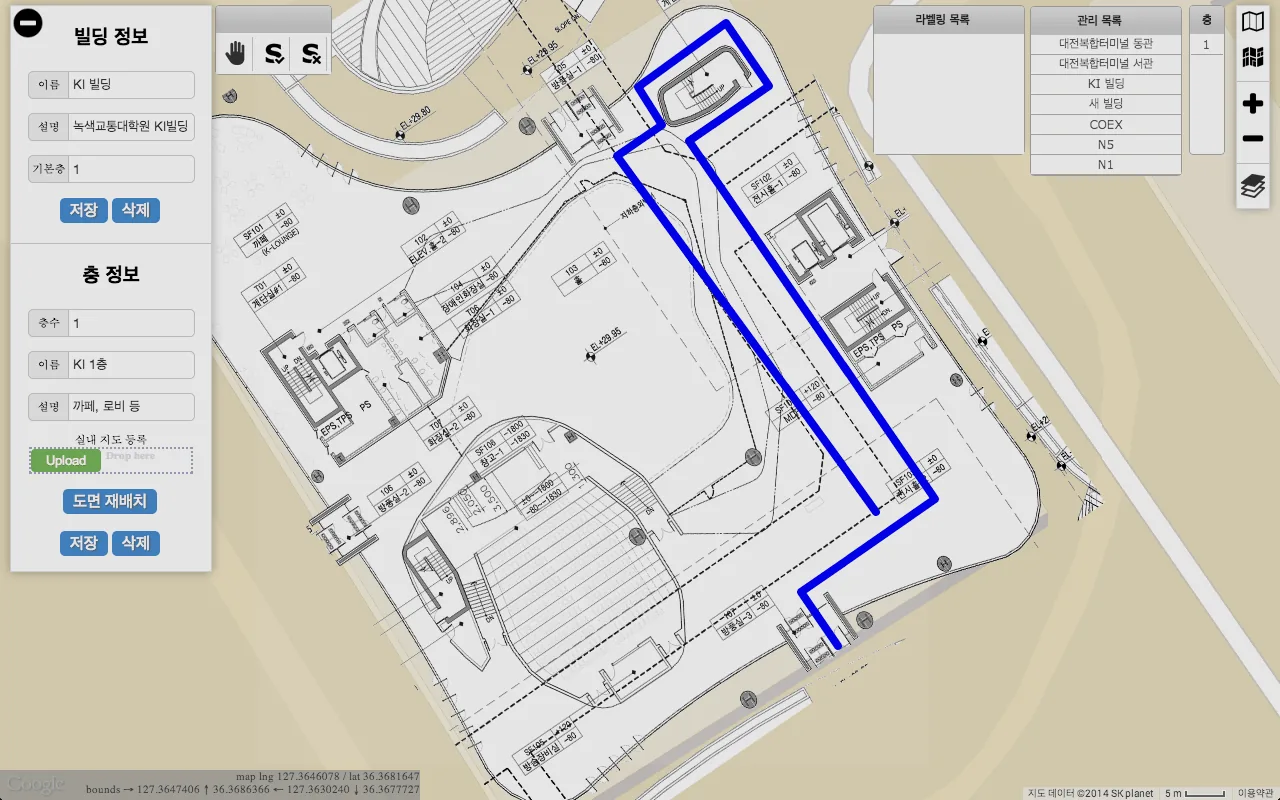
Click the survey button  at the top of the map (Figure 18) and click the start point of a survey line. A survey line runs from its start point through any number of turning points to its end point; double-click the end point to register it as a planned path (Figures 20–21). Click the hand button to finish planning.
From here, collect the signals along the planned paths with the data collecting tool, which loads the registered plan.
 — open the full-size image
 — open the full-size image
 — open the full-size image
 — open the full-size image
Collecting signals
Install and run the data collecting tool
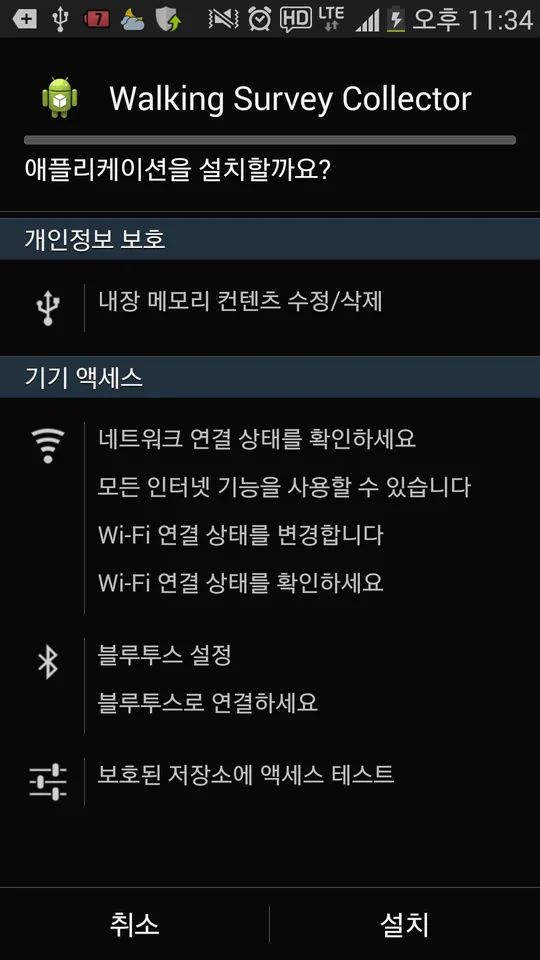
Install the Android data collecting tool — Walking Survey Collector — on the mobile device that will collect signals, such as a smartphone or a tablet (Figure 22).
Requirements
- Android 4.3 or later
- A wireless LAN (Wi-Fi) module
- An SD card
Installation
- Copy the
WSTool.apkfile to a folder on the device’s SD card. - Open the APK file with a file explorer app on the device.
- Tap Install to install the data collecting tool.
- Run the installed tool.
Sign in before using the tool. After the first sign-in, the tool signs in automatically when it starts; to sign out, press the device’s Menu button and choose Log out.
Configure the device
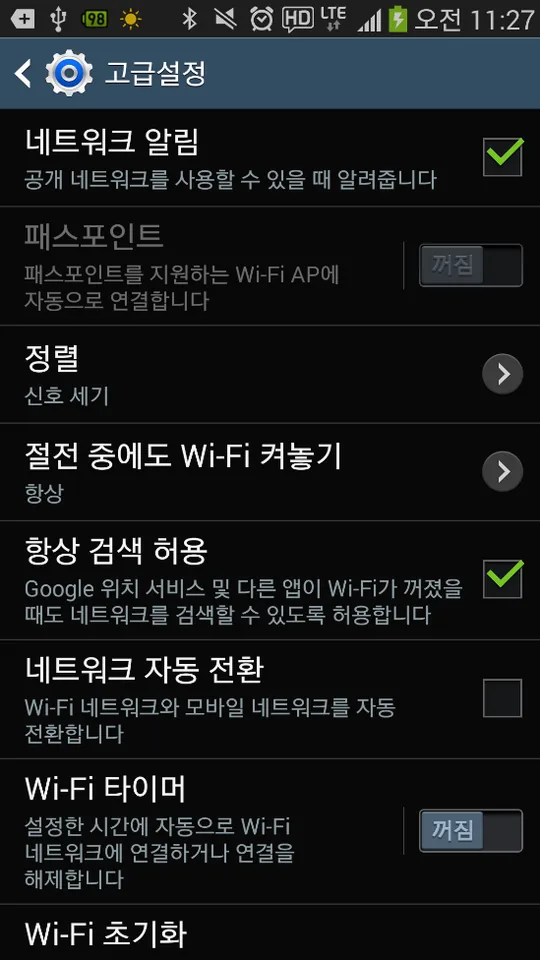
On the home screen, open Menu → Settings, select Wi-Fi on the Connections tab, then open Menu → Advanced. Turn on Always allow scanning (Figure 23).
 — open the full-size image
 — open the full-size image
Main view
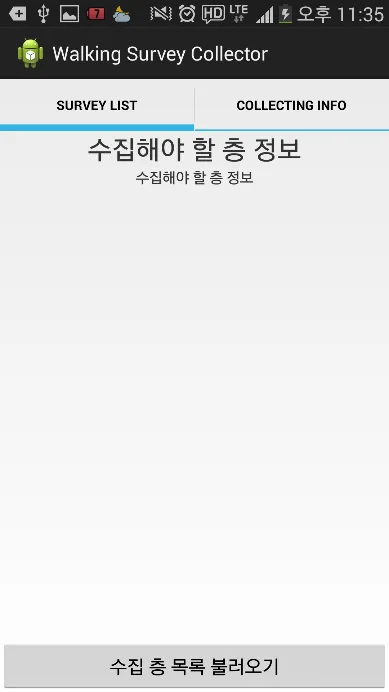
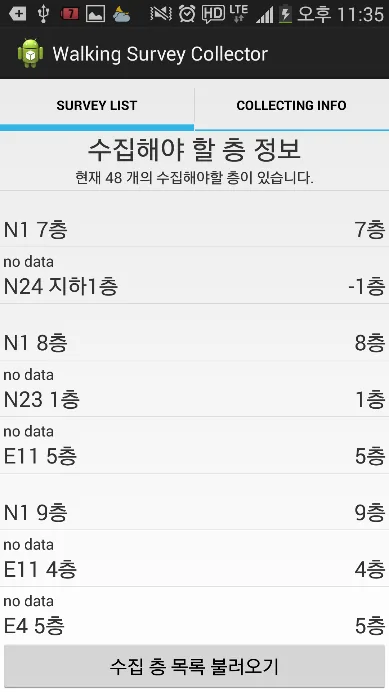
SURVEY LIST tab. This tab lists the floors registered in the web-based map construction tool. Tap Load survey floors to load the floors registered with your ID and show them as a list (Figures 24–25). Tap the floor where you want to collect signals: the tool downloads the floor plan and the survey lines registered for it, stores them on the device and opens the collecting view of the floor.
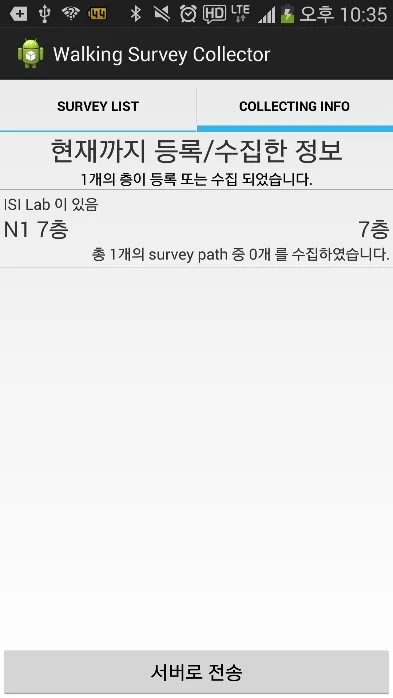
COLLECTING INFO tab. Floors you select in the SURVEY LIST tab are added to the COLLECTING INFO tab, and their information is stored on the device (Figure 26). You can therefore open the collecting view of these floors even without an internet connection (Wi-Fi, 3G or 4G); caution 2 in step 3 below explains why the connection matters. The tab also summarizes the collection for each floor — how many survey lines (survey paths) it has and how many of them have been collected — and its Send data button uploads the collected data to the server when collection is finished.
 — open the full-size image
 — open the full-size image
 — open the full-size image
Collect data in four steps
In the collecting view you can move, rotate and zoom the floor plan.
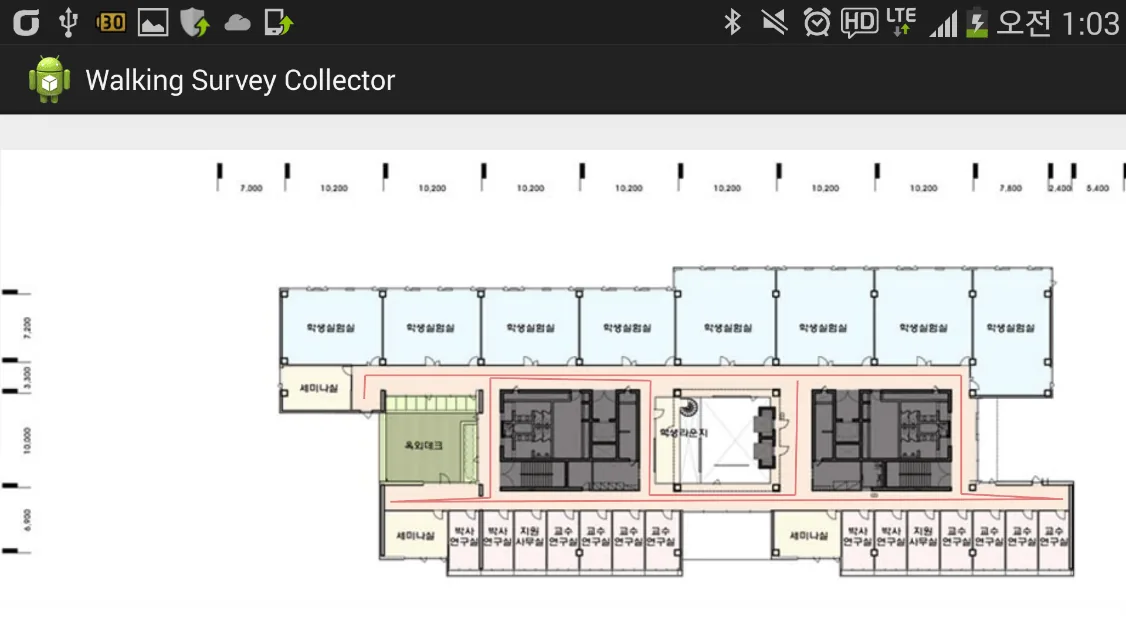
Step 1 — Check the survey plan. The collecting view shows the registered floor plan with its planned survey lines (Figure 27). A floor can have one or more survey lines, depending on how they were drawn in the web tool.
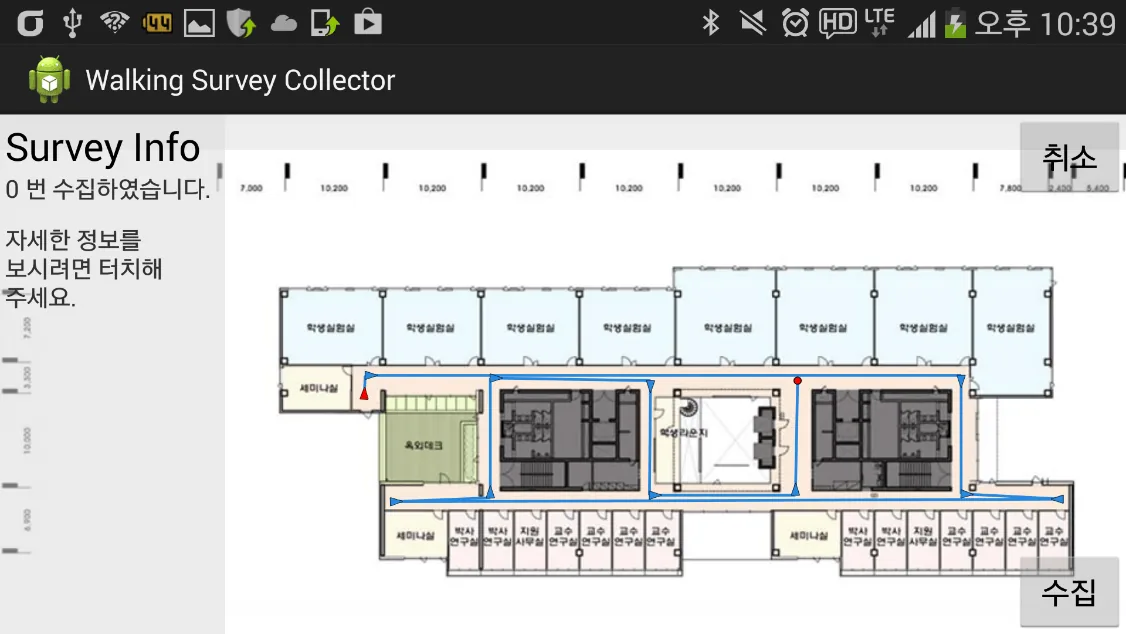
Step 2 — Get ready and check the direction. Select a survey line: it turns blue and shows where to start and where to finish — the red triangle is the start point and the red circle is the end point (Figure 28).
- Survey Info shows how many times the selected survey line has been collected; tap it for details (see “Check the collected data” below).
- Collect starts collecting. Cancel deselects the survey line and returns to the previous state.
Step 3 — Start collecting. Go to the start point of the planned path (the red triangle), tap Collect and walk along the survey line with comfortable, regular steps. When you reach the end point (the red circle), tap Complete collecting.
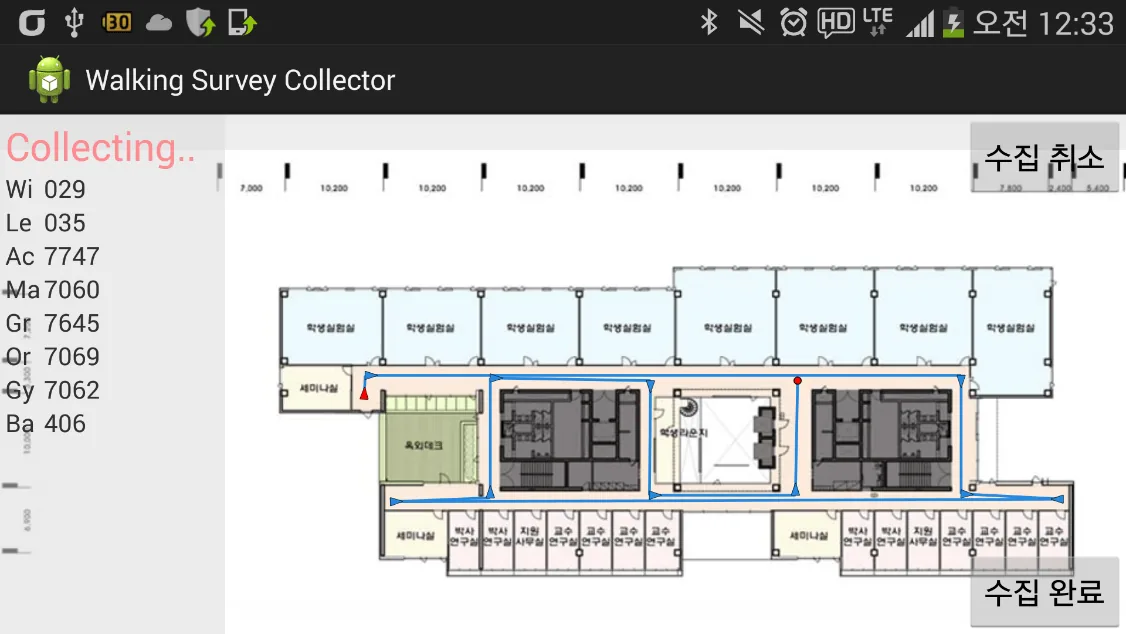
While collecting, the tool records Wi-Fi and BLE signal strength and sensor data — 3-axis accelerometer, gyroscope, compass and barometer. The Collecting… view shows the progress in real time (Figure 29). You can move, zoom and rotate the map during collection if the floor plan becomes confusing.
- Cancel collecting cancels the collection in progress.
- Complete collecting stops collecting and stores the collected data on the device.
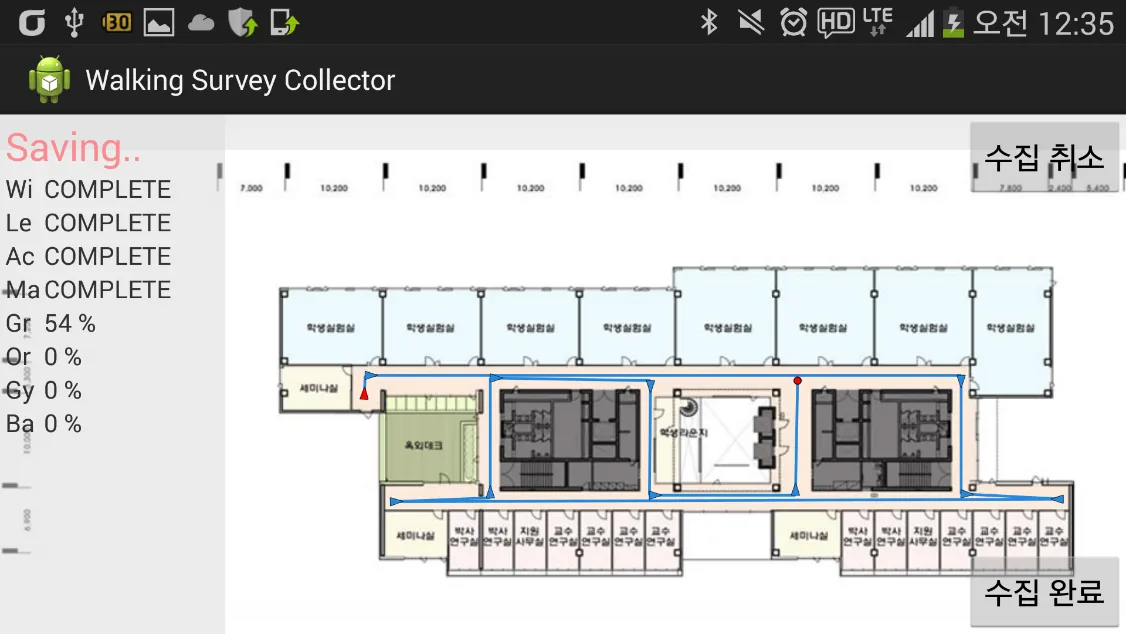
Step 4 — Save. When collection ends, the collected data is stored on the device. The Saving… view shows the progress for each type of data — Wi-Fi, BLE and sensor data — and shows COMPLETE when saving has finished (Figure 30).
Check the collected data
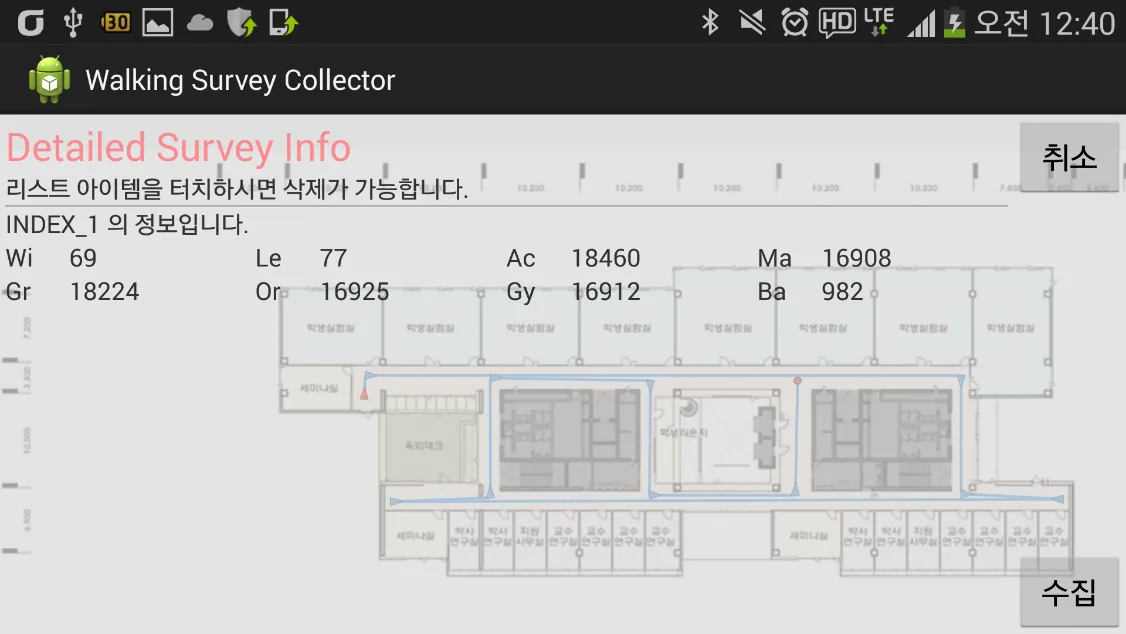
To see how many Wi-Fi scans or sensor samples were collected, tap Survey Info. It shows how many times each survey line has been collected and the details of each collection (Figure 31). If a collection went wrong, select it in the list and delete it.
When should collected data be deleted? For example, when Complete collecting was tapped by mistake before reaching the end point, or when the collector walked too fast or ran. Too few Wi-Fi scans are then collected and a good radio map is unlikely; delete the data and collect again.
 — open the full-size image
 — open the full-size image
 — open the full-size image
 — open the full-size image
 — open the full-size image
Upload the collected data to the KAILOS server
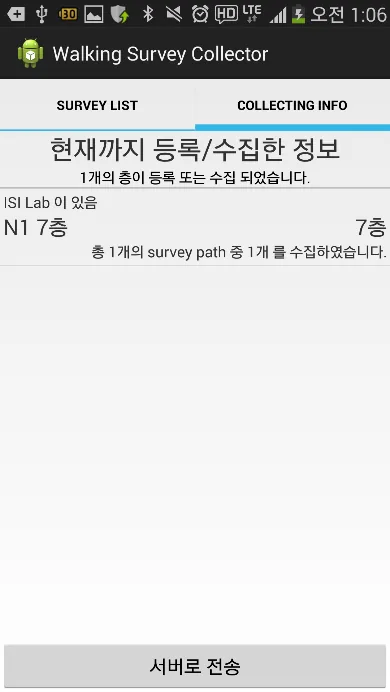
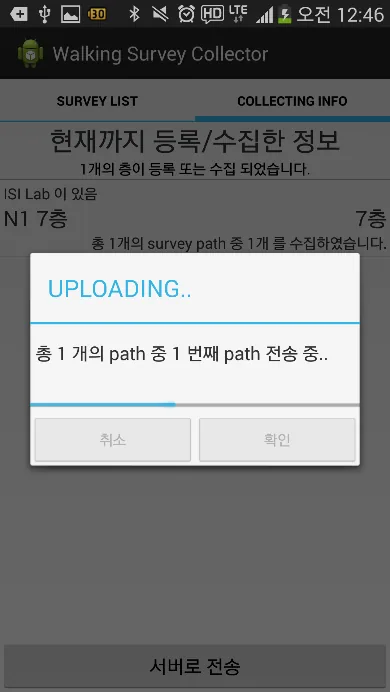
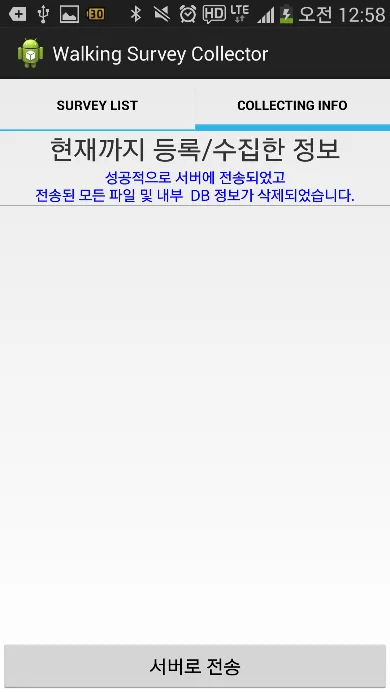
When collection is finished as planned, upload the collected data to the server: tap Send data in the COLLECTING INFO tab (Figures 32–33). After a successful upload, a message confirms it and the collected data is deleted from the device (Figure 34).
 — open the full-size image
 — open the full-size image
 — open the full-size image
Completing the radio map
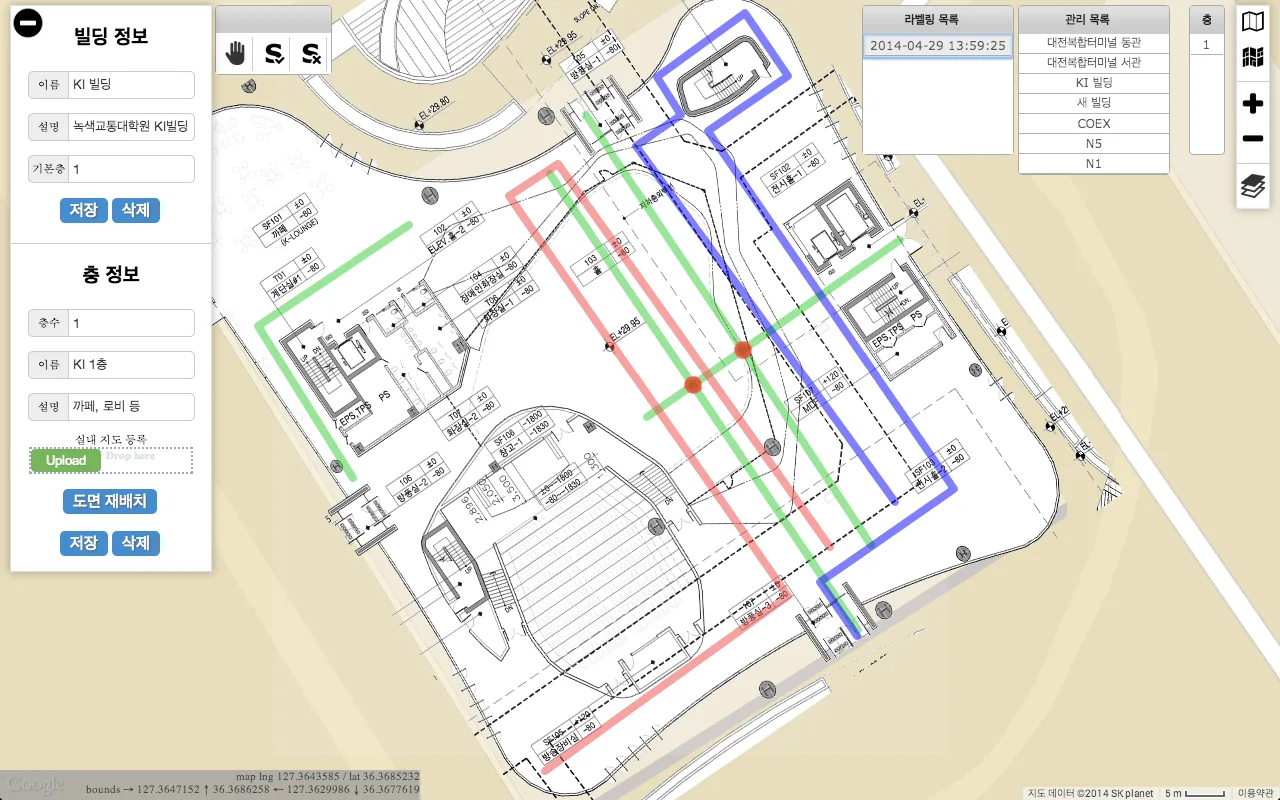
Once the collected signals and sensor data have been sent to the KAILOS server, run labeling to complete the radio map. Labeling analyzes the collected data, tags the collected fingerprints with their locations and builds the indoor radio map automatically.
Select the survey plan you registered (Survey Plan), then choose Labeling in the labeling window. The radio map is complete (Figure 35).
 — open the full-size image
Test navigation
When the radio map is complete, you can track your location with the KAILOS positioning API. The Android test navigation app, KAILOS Localization Tester, shows the location estimated by the KAILOS positioning API on the maps you added.
Requirements
- Android 4.0 or later
- A wireless LAN (Wi-Fi) module
- An SD card
- 10 MB of free space
Installation
- Get the app package,
kailos-tester.apk. - Copy the APK file to a folder on the device’s SD card.
- Open the APK file with a file explorer app on the device.
- Tap Install to install the test navigation app.
- Run the installed app.
Using the app
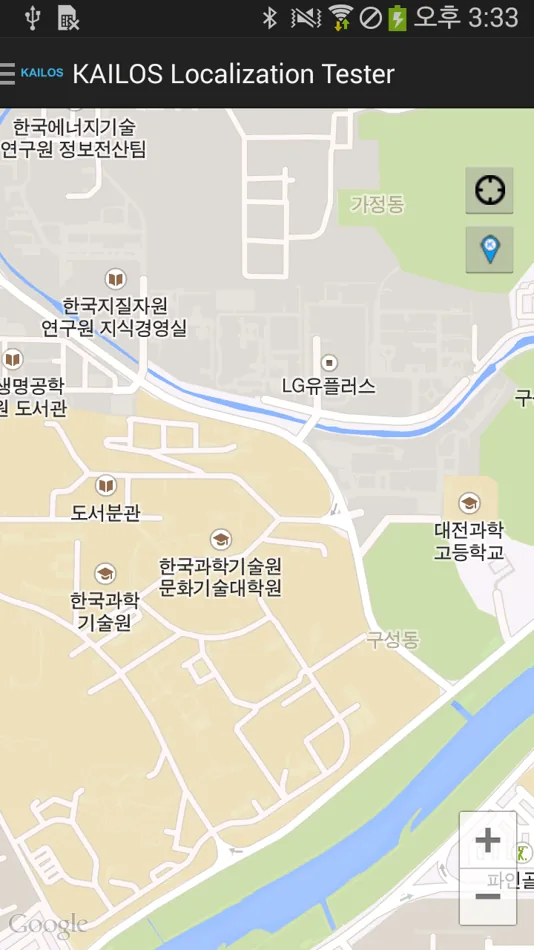
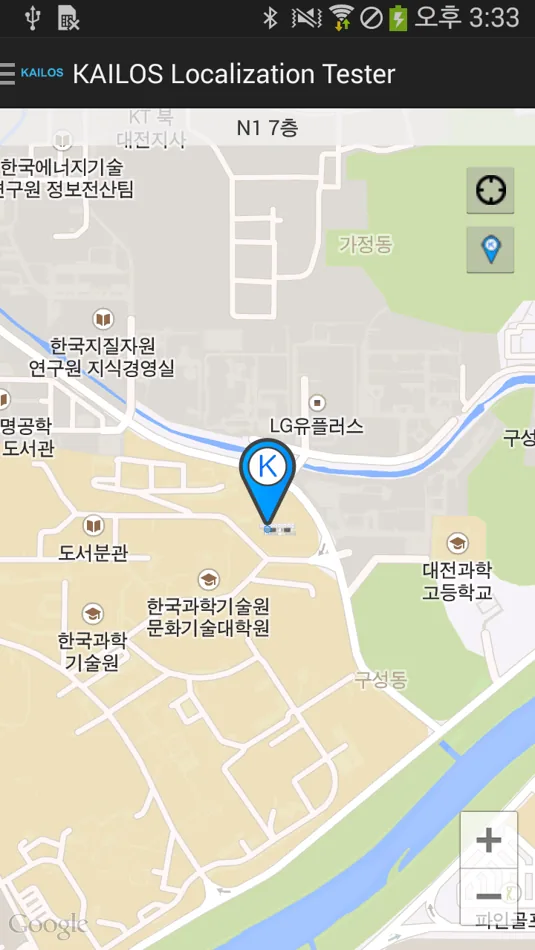
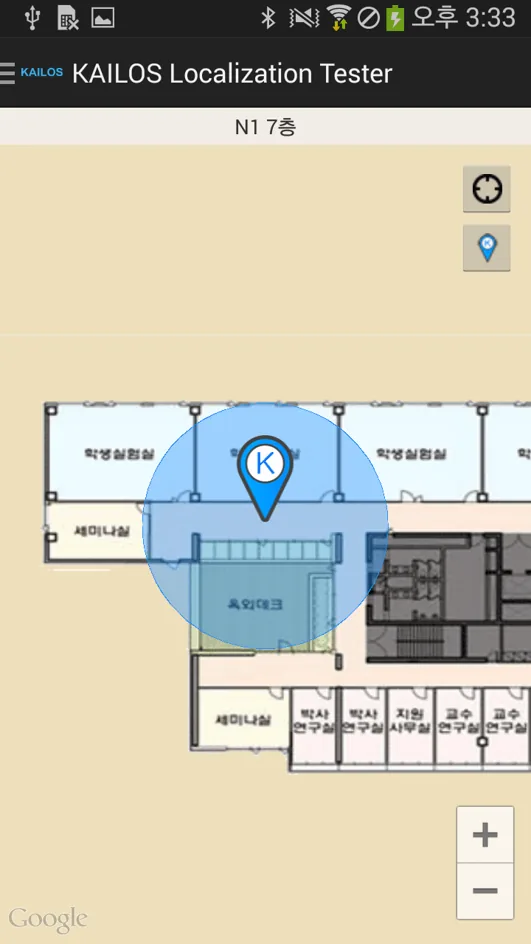
The app is intuitive, with only a few functions — if you already use mobile map apps, you can skip this part. When the app starts, it shows the map (Figure 36). The two buttons at the top right control location tracking:
 starts or stops location tracking. When tracking starts, the estimated location is marked on the map (
 moves and zooms the map to the estimated location; the marker then follows you as you move (
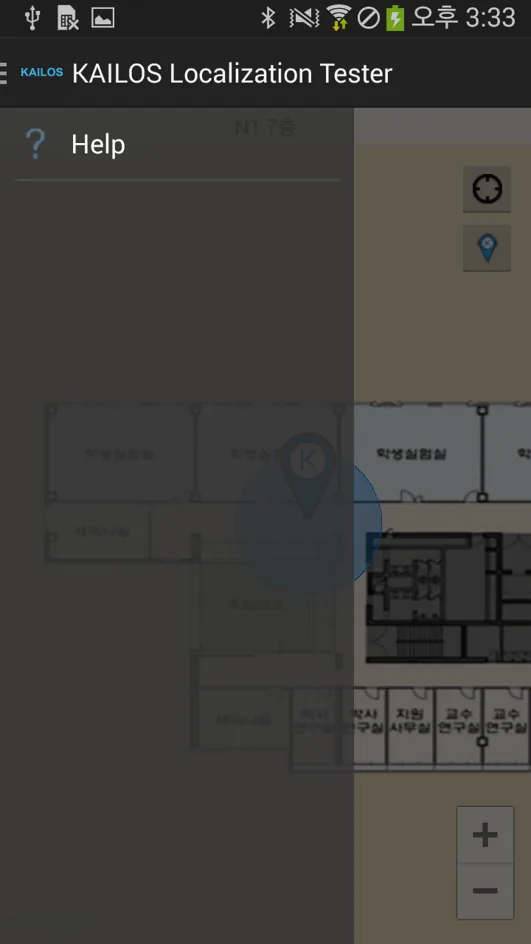
To open the help, open the menu — tap the menu button or swipe from the left edge of the screen — and choose Help (Figure 39).
 — open the full-size image
 — open the full-size image
 — open the full-size image
 — open the full-size image
Step 2: Develop applications with the KAILOS API
To support the development of indoor location-based services, KAILOS provides the APIs needed for application development as RESTful web services. Paths are relative to the KAILOS server; for API access and the server address for your project, contact our team.
Position API
Estimate location
POST/api/location
Estimates the user’s location from a Wi-Fi fingerprint, a BLE scan and satellite positioning data.
Parameters
- data
- JSON, as below.
{
  "wifi": [ // Fingerprint (list of AP scans)
    {
      "bssid": "00:26:66:2f:43:60", // BSSID
      "rss": -80, // RSS
      "ssid": "Welcome-KAIST" // SSID (optional)
    },
    ...
  ],
  "ble": [ // BLE fingerprint (scan result over one second)
    {
      "bssid": "00:26:66:2f:43:61",
      "rss": -85,
      "device_name": "myPhone" // (optional)
    },
    ...
  ],
  "gps": [
    {
      "lng": 100.0, // Longitude
      "lat": 100.0, // Latitude
      "acc": 0.0, // Accuracy
      "alt": 0.0, // Altitude
      "bear": 0.0, // Bearing
      "elap": 0.0, // Elapsed real-time nanos
      "speed": 0.0, // Speed
      "time": 0.0 // Time
    },
    ...
  ]
}{
"lnglat": { // GeoJSON format
type: "Point", // GeoJSON Point type
coordinate: [100.0, 100.0] // GeoJSON coordinate: [lng, lat] (WGS-84)
},
"alt": 45.0000, // Altitude (optional)
"level": 7, // Level number
"floorID": 9, // Floor map ID
"bd": "N1", // Building code (optional)
"err": 6.7 // Position error (optional)
}Update survey data
POST/api/db/updateSurveyData
Uploads Wi-Fi survey data (access-point scans at known locations) to the radio map database.
Parameters
- data
- JSON, as below.
{
  "wifiList": [
    {
      "apList": [
        {
          "ssid": "isiLab",
          "bssid": "00:26:66:2f:43:60",
          "rssi": -89
        },
        ...
      ],
      "lng": 127.36534260538609,
      "lat": 36.374168514955834,
      "level": 7, // Building floor
      "bd": "N1", // Building name
      "floorID": 9 // Unique floor ID
    },
    ...
  ]
}
Response HTTP status code.
Map API
Retrieve a floor map
GET/floors/{floorId}/image
Returns the floor plan image of a floor.
Parameters
- floorId
- Floor ID.
GET /floors/554ff57ec900625812229172/imageGet the POIs of a floor
GET/pois/floor/{floorId}
Returns the points of interest registered on a floor. Append the floor ID to the URL; the response is a string that you parse as JSON.
Parameters
- floorId
- Floor ID.
GET /pois/floor/533107a2eff3417c12f357f9[
{
"_id": "54866f6c32c4250829314146", // POI ID
"category": "prof", // POI category
"floorId": "533107a2eff3417c12f357f9", // Floor ID
"geometry": { // Location as GeoJSON
"type": "Point",
"coordinates": [127.36565597355366, 36.37398342955928]
},
"name": "한동수 Demo", // POI name
"level": "3", // Zoom level of the POI (importance)
"roomNumber": "704", // Room number
"zoomEnd": 30, // Not used
"zoomStart": 15, // Not used
"userId": "5322d496285a9bfc0537539f", // ID of the user who registered the POI
"regTime": "1418096492643", // Registration timestamp
"description": "DongSoo Han - Demo" // Description
},
{
"_id": "54c95ac0bed48ea802d0ddb8",
"category": "elevator",
"floorId": "533107a2eff3417c12f357f9",
"geometry": {
"type": "Point",
"coordinates": [127.36574783921242, 36.3740876309574]
},
"name": "",
"level": "3",
"roomNumber": "",
"zoomEnd": 30,
"zoomStart": 15,
"userId": "5322d496285a9bfc0537539f",
"regTime": 1422482112074,
"description": ""
},
...
{
"_id": "551a582f65ea1154059b0a11",
"category": "lab",
"floorId": "533107a2eff3417c12f357f9",
"geometry": {
"type": "Point",
"coordinates": [127.3655292391777, 36.37419723124106]
},
"name": "ISILab",
"level": "3",
"roomNumber": "723",
"zoomEnd": 30,
"zoomStart": 15,
"userId": "5322d496285a9bfc0537539f",
"regTime": 1427789871625,
"description": "ISILab"
}
]Android example (Java, from the original manual)
// KAILOS_SERVER: the address of your KAILOS server.
public class PoiRestThread extends Thread {
    private static String TAG = "PoiRestThread";
    public static boolean isThreadWorking = false;

    private String mFloorId;

    public PoiRestThread() {
    }

    public void setRequestFloorId(String floorId) {
        mFloorId = floorId;
    }

    public void start() {
        isThreadWorking = true;
        super.start();
    }

    // Requests the POIs of a floor, parses the JSON response and notifies a handler.
    public void run() {
        ArrayList poiList = null;

        try {
            String strRequestURL = KAILOS_SERVER + "/pois/floor/" + mFloorId;

            HttpGet httpGet = new HttpGet(strRequestURL);

            HttpParams httpParameters = new BasicHttpParams();
            HttpConnectionParams.setConnectionTimeout(httpParameters, Constants.SOCKET_TIME_OUT_MS * 2);
            HttpConnectionParams.setSoTimeout(httpParameters, Constants.SOCKET_TIME_OUT_MS);

            DefaultHttpClient httpClient = new DefaultHttpClient(httpParameters);
            ClientConnectionManager clientConnectionManager = httpClient.getConnectionManager();
            httpClient = new DefaultHttpClient(
                new ThreadSafeClientConnManager(httpParameters, clientConnectionManager.getSchemeRegistry()),
                httpParameters);
            ResponseHandler responseHandler = new BasicResponseHandler();

            String strResponse = httpClient.execute(httpGet, responseHandler);

            if (strResponse != null && !strResponse.equals("null")) {
                Log.i(TAG, strResponse);
                // The POIs of the floor were retrieved.
            }
        } catch (Exception e) {
            // Exceptions such as time-outs are ignored.
        }
    }
}
Get the POIs of a floor by category
GET/pois/floor/{floorId}/{categoryType}
Same as getting the POIs of a floor, with a category type from the list below appended to the URL. The response has the same format.
Parameters
- floorId
- Floor ID.
- categoryType
- POI category type, for example
elevator.
POI categories
POIs use the following category types, grouped by category.
| Category | Types |
|---|---|
| education |
|
| emergency |
|
| store |
|
| facility |
|
| general |
|
| floorchange |
|
| etc |
|
Get the floors of a building
GET/floors/building/{buildingId}
Returns the floor list of a building.
Parameters
- buildingId
- Building ID.
[
  {
    "_id": "5403e318b11b008c1406a646",
    "buildingId": "5403e318b11b008c1406a645",
    "description": "1",
    "floorNumber": 1,
    "floorPlanType": "image/png",
    "geometry": {
      "type": "Polygon",
      "coordinates": [
        ["127.3662497", "36.3745616"],
        ["127.3650642", "36.3740173"]
      ],
      "angle": "0"
    },
    "name": "1",
    "regTime": "1409540888640",
    "userId": "5322d496285a9bfc0537539f",
    "zoomEnd": "28",
    "zoomStart": "15"
  },
  {
    "_id": "5403e5d7b11b008c1406a647",
    "buildingId": "5403e318b11b008c1406a645",
    "description": "2",
    "floorNumber": 2,
    "floorPlanType": "image/png",
    "geometry": {
      "type": "Polygon",
      "coordinates": [
        ["127.36624958772654", "36.37456190071682"],
        ["127.36512807350164", "36.374028005943565"]
      ],
      "angle": "0.00"
    },
    "name": "2",
    "regTime": "1409541591516",
    "userId": "5322d496285a9bfc0537539f",
    "zoomEnd": "28",
    "zoomStart": "15"
  }
]
Route API
Find a route
POST/routes
Finds the navigation route between two points, indoors or outdoors. The response is a string that you parse as JSON: the route as a list of segments.
Body (application/x-www-form-urlencoded)
- startFloorId
- Floor ID of the start point if it is indoors; an empty string if it is outdoors.
- startX
- Longitude of the start point.
- startY
- Latitude of the start point.
- endFloorId
- Floor ID of the destination if it is indoors; an empty string if it is outdoors.
- endX
- Longitude of the destination.
- endY
- Latitude of the destination.
[
  {
    "lng1": 127.36141960240502, // Longitude of the segment start
    "lat1": 36.370199561212004, // Latitude of the segment start
    "lng2": 127.36141960240502, // Longitude of the segment end
    "lat2": 36.370199561212004, // Latitude of the segment end
    "type": "OUT" // Segment type: OUT = outdoor, IN_OUT = indoor-outdoor connection, IN = indoor
  },
  ...
  {
    "lng1": 127.36456921426938,
    "lat1": 36.37411861283401,
    "lng2": 127.36458644270897,
    "lat2": 36.37414054145845,
    "type": "IN_OUT"
  },
  {
    "lng1": 127.36458644270897,
    "lat1": 36.37414054145845,
    "lng2": 127.36458644270897,
    "lat2": 36.37414054145845,
    "type": "IN",
    "floorNumber": 100, // Floor number of an indoor segment
    "floorId": "5493d972eb4b45d42d777720", // Floor ID
    "buildingId": "5403e318b11b008c1406a645" // ID of the building the floor belongs to
  },
  ...
]
Android example (Java, from the original manual)
// KAILOS_SERVER: the address of your KAILOS server.
package kr.ac.kaist.isilab.kai_navi.route;

import java.util.ArrayList;
import java.util.List;

import kr.ac.kaist.isilab.kai_navi.utils.Constants;

import org.apache.http.NameValuePair;
import org.apache.http.client.ResponseHandler;
import org.apache.http.client.entity.UrlEncodedFormEntity;
import org.apache.http.client.methods.HttpPost;
import org.apache.http.conn.ClientConnectionManager;
import org.apache.http.impl.client.BasicResponseHandler;
import org.apache.http.impl.client.DefaultHttpClient;
import org.apache.http.impl.conn.tsccm.ThreadSafeClientConnManager;
import org.apache.http.message.BasicNameValuePair;
import org.apache.http.params.BasicHttpParams;
import org.apache.http.params.HttpConnectionParams;
import org.apache.http.params.HttpParams;

import android.content.Context;
import android.util.Log;

public class RouteRestThread extends Thread {
    private static String TAG = "RouteRestThread";
    public static DefaultHttpClient mHttpClient = null;
    private static Context mContext = null;

    private String mStartFloorId = "";
    private Double mStartLng = 127.36561;
    private Double mStartLat = 36.374101;

    private String mEndFloorId = "";
    private Double mEndLng = 127.36561;
    private Double mEndLat = 36.374101;

    public static void createHttpClient() {
        HttpParams httpParameters = new BasicHttpParams();
        HttpConnectionParams.setConnectionTimeout(httpParameters, 20000);
        HttpConnectionParams.setSoTimeout(httpParameters, 10000);

        mHttpClient = new DefaultHttpClient(httpParameters);
        ClientConnectionManager clientConnectionManager = mHttpClient.getConnectionManager();
        mHttpClient = new DefaultHttpClient(
            new ThreadSafeClientConnManager(httpParameters, clientConnectionManager.getSchemeRegistry()),
            httpParameters);
    }

    public void setContext(Context context) {
        mContext = context;
    }

    public RouteRestThread() {
    }

    public void setRequestData(Double startLng, Double startLat, String startFloorId,
                               Double endLng, Double endLat, String endFloorId) {
        mStartFloorId = startFloorId;
        mStartLng = startLng;
        mStartLat = startLat;
        mEndFloorId = endFloorId;
        mEndLng = endLng;
        mEndLat = endLat;
    }

    @Override
    public void start() {
        super.start();
    }

    @Override
    public void run() {
        try {
            String strServerURL = KAILOS_SERVER + "/routes";

            if (mHttpClient == null)
                createHttpClient();

            HttpPost httpPost = new HttpPost(strServerURL);
            httpPost.setHeader("Accept", "application/json");
            httpPost.setHeader("Accept-Language", "ko_KR");
            httpPost.setHeader("Content-Type", "application/x-www-form-urlencoded;charset=utf-8");

            List pairs = new ArrayList();
            pairs.add(new BasicNameValuePair("startX", mStartLng.toString()));
            pairs.add(new BasicNameValuePair("startY", mStartLat.toString()));
            pairs.add(new BasicNameValuePair("startFloorId", mStartFloorId));
            pairs.add(new BasicNameValuePair("endX", mEndLng.toString()));
            pairs.add(new BasicNameValuePair("endY", mEndLat.toString()));
            pairs.add(new BasicNameValuePair("endFloorId", mEndFloorId));

            httpPost.setEntity(new UrlEncodedFormEntity(pairs));

            ResponseHandler responseHandler = new BasicResponseHandler();
            String strResponse = mHttpClient.execute(httpPost, responseHandler);

            if (strResponse != null && !strResponse.equals("null")) {
                Log.i(TAG, strResponse);
                // The route was retrieved.
            }
        } catch (Exception e) {
            Log.e(TAG, e.getMessage());
        }
    }
}
Earlier endpoints
The English edition of the original manual documents an earlier form of the Map and Route APIs, in which every query is a POST request to /api/map/…. They are listed here for existing integrations.
Show the earlier Map and Route endpoints
Retrieve floor maps
POST/api/map/getFloorMaps
Parameters
- data
- JSON, as below.
{
  "queryType": "NEAREST_ENTIRE", // Query type [NEAREST_ENTIRE | NEAREST_REPRESENTATIVE | FLOOR_ID]
  "lng": "100.0", // Longitude (used for NEAREST_ENTIRE, NEAREST_REPRESENTATIVE)
  "lat": "101.0", // Latitude (used for NEAREST_ENTIRE, NEAREST_REPRESENTATIVE)
  "floorID": "1234" // Floor ID (used for FLOOR_ID)
}{
"floormaps": [
{
"objID": 14,
"neLat": 36.374393463134766,
"neLng": 127.36409759521484,
"swLat": 36.373573303222656,
"swLng": 127.36292266845703,
"angle": 0,
"areaID": 1,
"buildingID": 15,
"floorID": 12,
"category": "IMG",
"memberID": 1,
"floorName": "N5 2F",
"floorNumber": 2,
"buildingName": "N5 기초과학연구동",
"floorNumberBase": 2,
"areaName": "KAIST 한국과학기술원",
"imageURL": "uploads/1____1377087116.png"
},
...
]
}Get POIs
POST/api/map/directory
Parameters
- data
- JSON, as below.
{
  "queryType": "POI", // Query type [POI]
  "keyword": "dongsoo" // Search keyword
}{
"poi": [
{
"_id": "525cc557fd4be8314bc5951d",
"floorId": "525cc3f8fd4be8314bc594e7",
"name": {
"kr": "한동수",
"en": "Dongsoo Han"
},
"category": "prof",
"roomNumber": "814",
"visibleZoomStart": 19,
"visibleZoomEnd": 30,
"geometry": {
"type": "POINT",
"coordinates": [[127.3660891, 36.3740404]]
},
"memberId": "1"
},
{
"_id": "525cc557fd4be8314bc5952b",
"floorId": "525cc3f8fd4be8314bc594e5",
"name": {
"kr": "한동수",
"en": "Dongsoo Han"
},
"category": "prof",
"roomNumber": "704",
"visibleZoomStart": 19,
"visibleZoomEnd": 30,
"geometry": {
"type": "POINT",
"coordinates": [[127.365545, 36.3740436]]
},
"memberId": "1"
}
]
}Get the road network of a floor
POST/api/map/route
Parameters
- queryType
GET_ROADS_BY_FLOORID- floorId
- Floor ID (string).
queryType: "GET_ROADS_BY_FLOORID"
floorId: "525cc3f8fd4be8314bc594c3"{
"road": [
[
[127.363031, 36.37373, "525cc3f8fd4be8314bc594c3"],
[127.363031, 36.37373, "525cc3f8fd4be8314bc594c9"]
],
[
[127.363017, 36.374319, "525cc3f8fd4be8314bc594c3"],
[127.363017, 36.374319, "525cc3f8fd4be8314bc594ca"]
],
[
[127.363018, 36.37432, "525cc3f8fd4be8314bc594c3"],
[127.363018, 36.37432, "525cc3f8fd4be8314bc594c9"]
]
]
}Find the shortest path
POST/api/map/route
Parameters
- queryType
FIND_PATH- from
- Start point: longitude, latitude, floor ID (string).
- to
- Destination: longitude, latitude, floor ID (string).
queryType: "FIND_PATH"
from: 127.3658898,36.3741702,525cc3f8fd4be8314bc594e7
to: 127.3658872,36.3741724,525cc3f8fd4be8314bc594e7{
"path": [
[127.3658872, 36.3741724, "525cc3f8fd4be8314bc594e7"],
[127.3658872, 36.3741238, "525cc3f8fd4be8314bc594e7"],
[127.3658872, 36.3740968, "525cc3f8fd4be8314bc594e7"],
[127.3658858, 36.3740579, "525cc3f8fd4be8314bc594e7"],
[127.3661031, 36.3740557, "525cc3f8fd4be8314bc594e7"],
[127.3661031, 36.3740795, "525cc3f8fd4be8314bc594e7"],
[127.3661031, 36.3741724, "525cc3f8fd4be8314bc594e7"]
]
}API support
For questions about using KAILOS and its API, or requests for additional APIs, talk to our team.
Talk to Our TeamOriginally published as the KAILOS Manual on kailos.io by KAIST’s Intelligent Service Integration Lab.